Open topic with navigation
Reports using Database Tables
Important: This procedure applies to districts on PowerSchool SMS 7.4 and higher. If you have legacy PowerSchool SMS or custom reports from version 4.2 or earlier,and the data source for these reports is ADO.NET (XML), you must update the data source for these reports so that they are compatible with Crystal Reports 2008. See Knowledgebase article 60932 Crystal Reports 2008 - How to Update Your Data Source.
If desired, you can build your report by connecting directly to the tables in the PowerSchool SMS database. This type of report can be customized only by those with access to district setup.
Reports that are created by connecting directly to tables in the database can include any available records in PowerSchool SMS.
Naming Conventions
To build reports using a direct link to the tables, you should have a solid understanding of the naming conventions for the tables, fields, and keys in the database.
Note: Table and field names are in ALL CAPS.
The names of the tables in the database are set up to convey as much information as possible in a limited amount of characters:
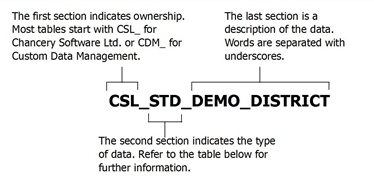
The second section of the name indicates the kind of information the table contains, abbreviated for quick reference. It is important to note that, while all of the tables are available for reporting, not all of them are useful for reporting. Use [Table 72] as a guide:
Table 72: Abbreviation Quick Reference
|
Abbreviation
|
Description
|
Used for Reporting?
|
|
ACT
|
Accounts (user and roles)
|
No
|
|
ADM
|
Administration
|
No
|
|
ASCII
|
ASCII import
|
No
|
|
BIN
|
Bins for report card
|
Yes
|
|
CDM
|
Custom Data Management
|
No
|
|
CNT
|
Contacts
|
Yes
|
|
CRS
|
Courses
|
Yes
|
|
DIS
|
District-wide
|
Yes
|
|
DS
|
Directory Service
|
Yes
|
|
FAM
|
Family information
|
Yes
|
|
HOMEROOM
|
Homeroom
|
Yes
|
|
RPT
|
Reports
|
No
|
|
SCH
|
Schools
|
Yes
|
|
SET
|
Setup Lists
|
Yes
|
|
SMS
|
SMS School
|
Yes
|
|
STD
|
Student
|
Yes
|
|
STRING
|
Event logs
|
No
|
|
TCH
|
Teacher
|
Yes
|
|
TRANSCRIPT
|
Transcripts
|
Yes
|
|
TTBL
|
Timetable information
|
Yes
|
|
WKL
|
Working lists
|
No
|
Each table contains a collection of records, and each record is made up of a series of fields. A field contains a single piece of information. A field name is simply a description of the information it contains, abbreviated as required and with underscores to separate words. Examples include LAST_NAME, GENDER, and STD_NUMBER.
Every table has a primary key, which is a field that uniquely identifies that table. These keys cannot be used as fields in your report.
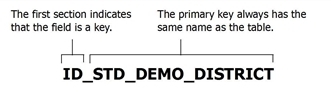
In addition to the primary key, tables can also contain foreign keys, which are links from other tables. Like the primary keys, foreign keys cannot be used as fields in your reports; they are for linking purposes only.
The foreign key has the same naming convention as the primary key, except that the name of the key is the name of the table to which it links. Foreign keys in the CSL_STD_DEMO_DISTRICT table, for example, include the following:
|
=
|
ID_DIS_ADDRESS (CSL_DIS_ADDRESS) |
|
=
|
ID_SET_GRADE_LEVEL (CSL_SET_GRADE_LEVEL) |
|
=
|
ID_ADM_ENROLLMENT_STATUS (CSL_ADM_ENROLLMENT_STATUS) |
Connections
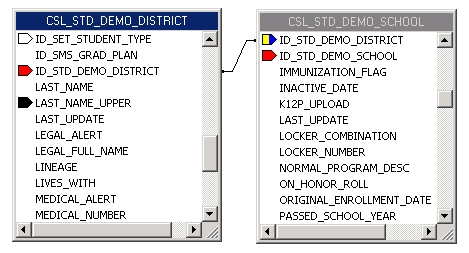
The tables in the database are independent entities. In a report, you must first specify the relationships between the relevant tables so that the report knows what path to take when it extracts information from the database. These connections are always formed by linking the primary key of one table to one of the foreign keys of the other table. The link looks like this:
One important thing to keep in mind when creating these links is where data is stored. Consider the example in [Figure 337]. A student’s demographic information is contained in the two tables CSL_STD_DEMO_DISTRICT and CSL_STD_DEMO_SCHOOL. To avoid replicating data, most of the fields are kept in the district table. That means that if you want to report on the student’s demographic information at the school level, you have to create a connection between these tables in order for that student’s name, birthdate, gender, etc. to be available in the report.
Figure 337: Connections
Creating Custom Reports (Database Tables)
With Crystal Reports, you can create many types of reports with varying levels of complexity.
Rather than repeating all of the information that is available in the Crystal Reports Online Help, this section summarizes how to create and modify a custom report based on the database tables. For detailed information, see the SAP Crystal Reports User's Guide at http://help.sap.com/analytics.
Note: Do not use the OLAP Wizard, which is suited to a different kind of database.
To illustrate the process, the following steps outline how to use the Standard Report Wizard to create a sample report [Figure 338] that:
|
=
|
lists the students in the district, and provides the following details about each one: first name, last name, student number, and enrollment status. |
|
=
|
groups students by school. |
|
=
|
provides summaries of the total number of students in each school and the total number of students in the district. |
|
=
|
filters records to show only students who have a registration status of Registered. |
To create a custom database table report, you need:
|
=
|
a user ID and password for the PowerSchool SMS database |
|
=
|
the name of the PowerSchool SMS database |
|
=
|
the name of the server that PowerSchool SMS database is on |
If you do not have this information, contact the district administrator.
|
1
|
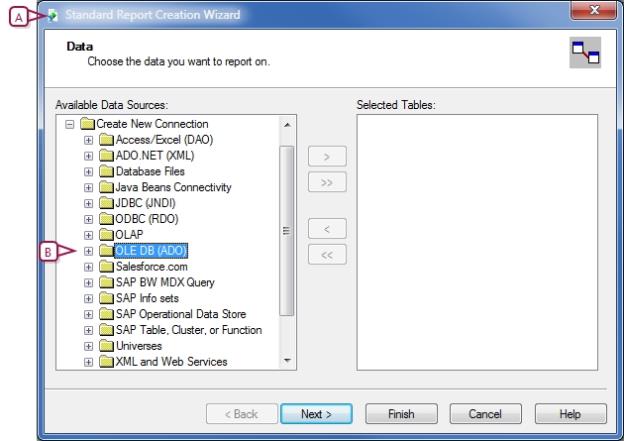
Start Crystal Reports and open the Report Wizard. The Standard Report Creation Wizard dialog appears [Figure 340]. |
|
2
|
Under Available Data Sources, click  next to Create New Connection, and then click next to OLE DB (ADO). The OLE DB (ADO) dialog appears. next to Create New Connection, and then click next to OLE DB (ADO). The OLE DB (ADO) dialog appears. |
|
3
|
In the Provider list, select Microsoft OLE DB Provider for SQL Server and click Next. |
|
4
|
Under Connection Information, enter the following information: |
|
=
|
Server: Enter the name of the server where the database resides. This is specific to your district. |
|
=
|
User ID: Enter the user ID of a user account that permits you to access the database. |
|
=
|
Password: Enter the password of a user account that permits you to access the database. |
|
=
|
Database: Enter the name of the database. A typical database name is CSL_SMS. |
|
1
|
Click next to the database name. |
|
2
|
Click next to Tables. |
|
3
|
Double-click the tables you want to use for the report. |
|
=
|
For the sample report, select the following tables: |
|
=
|
CSL_ADM_ENROLLMENT _STATUS |
|
=
|
CSL_SET_REGISTRATION_STATUS |
|
4
|
Click Next. The dialog displays a Links tab that shows a diagram of the tables you chose and the fields they share. |
Note: The links that Crystal Reports creates automatically are usually more complex than most reports require. It is a good idea to get into the habit of clearing the existing links and setting up your own links as required.
|
2
|
Arrange the tables so that you can work with them more easily: |
|
=
|
Resize the dialog so that you can see all of the tables. |
|
=
|
Resize each table so that you can see all of the fields in it. |
|
3
|
Link the tables by dragging a field in one table to the field of the same name in another table, depending on the type of information you want. |
|
=
|
For the sample report, ensure the following links exist [Figure 341]: |
|
Drag this field
|
To this field
|
|
ID_STD_DEMO_DISTRICT field in CSL_STD_DEMO_DISTRICT table
|
The same field in CSL_STD_DEMO_SCHOOL table
|
|
ID_SET_REGISTRATION_STATUS field in CSL_STD_DEMO_DISTRICT table
|
The same field in CSL_SET_REGISTRATION_STATUS table
|
|
ID_SET_SCHOOL_NAME field in CSL_STD_DEMO_DISTRICT table
|
The same field in CSL_SET_SCHOOL_NAME table
|
|
ID_ADM_ENROLLMENT_STATUS field in CSL_STD_DEMO_DISTRICT table
|
The same field in CSL_ADM_ENROLLMENT_STATUS table
|
|
1
|
On the Fields page, under Available Fields, expand the tables, and double-click the fields that you want displayed on the report. |
|
2
|
Under Fields To Display, the fields are shown in alphabetical order in the format TableName.FieldName. |
|
=
|
For the sample report, double-click the following fields [Figure 342]: |
|
From this table
|
Double-click this field
|
|
CSL_ADM_ENROLLMENT_STATUS
|
ENROLLMENT_STATUS_DESC
|
|
CSL_STD_DEMO_DISTRICT
|
STD_NUMBER
|
|
CSL_STD_DEMO_DISTRICT
|
LAST_NAME
|
|
CSL_STD_DEMO_DISTRICT
|
FIRST_NAME
|
|
3
|
Under Fields To Display, change the order of the fields by clicking a field, and then clicking the arrows to move it up or down. Note: In the final report, items in the Fields to Display list are displayed as columns from left to right. The higher an item is in the Fields to Display list, the further left it appears in the final report. |
|
=
|
For the sample report, re-order the fields as follows [Figure 343]:
|
|
=
|
CSL_STD_DEMO_DISTRICT.LAST_NAME
|
|
=
|
CSL_STD_DEMO_DISTRICT.FIRST_NAME
|
|
=
|
CSL_STD_DEMO_DISTRICT.STD_NUMBER
|
|
=
|
CSL_ADM_ENROLLMENT_STATUS.ENROLLMENT_STATUS_DESC |
Grouping data in a report allows you to summarize your data in meaningful ways.
|
1
|
On the Grouping page, under Available Fields, under Report Fields, double-click the fields that you want to group data by. |
|
=
|
For the sample report [Figure 344], in the CSL_SET _SCHOOL_NAME table, double-click SCHOOL_NAME_DESC. |
|
2
|
Click Next. The Summaries page appears. |
|
3
|
Under Available Fields, double-click any fields you want to summarize. |
|
=
|
For the sample report, double-click CSL_STD_DEMO_DISTRICT.STD_NUMBER . |
|
4
|
Under Summarized Fields, for each summary indicated by  , click the summary, and then select the summary type from the dropdown under Summarized Fields. , click the summary, and then select the summary type from the dropdown under Summarized Fields. |
|
=
|
For the sample report, click the summary indicated by . In the dropdown under Summarized Fields, select Count. |
|
5
|
Click Next. The Group Sorting page appears. |
|
6
|
Sort items as required. |
|
=
|
For the sample report, do not use this feature. |
|
7
|
Click Next. The Chart page appears. |
|
8
|
Add a chart if required. |
|
=
|
For the sample report, do not use this feature. |
Use data filtering to isolate the results of the report to include only the information you’re interested in returning. You specify the selection criteria on the Record Selection page.
|
1
|
On the Record Selection page, under Available Fields, double-click a field that you want to filter data on. |
|
=
|
For the sample report, in the CSL_SET_REGISTRATION_STATUS table, double-click the REGISTRATION_STATUS_DESC field. |
|
2
|
Under Filter Fields, select a comparison method, and then select a value. |
|
=
|
In the dropdown displayed under Is Equal To, select Registered. |
|
3
|
Click Finished. A preview of the report is displayed. |
|
=
|
adding special fields, such as print date |
|
=
|
adding text objects, such as a title |
|
=
|
formatting text in fields and text objects |
|
=
|
moving, resizing, or deleting fields and text objects |
For more information, see Report building using Crystal Reports [>>].
|
3
|
From the File menu, clear Save Data with Report. |
|
4
|
Save and close the report. |
Note: If the report is being used solely at the district level by only a few users, you may prefer to leave the report in Crystal Reports. Some of the more complex features in Crystal Reports, such as parameters, do not transfer into PowerSchool SMS.
Custom reports you are creating for use by a larger number of users should be uploaded to and run in PowerSchool SMS [>>].
Once you have created a custom report, you should perform a test run of the report using various filters and user IDs to ensure that the appropriate data is returned [>>]. All school reports are run in PowerSchool SMS .
Figure 338: Sample report
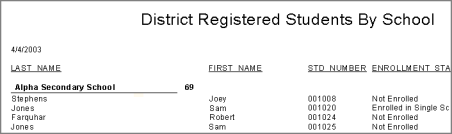
Figure 339: Standard report wizard
|
A
|
The title and appearance of this dialog depends on whether you are working with a blank report or one of the wizards. |
|
B
|
Use the OLE DB (ADO) data source to create custom reports using database tables. |
Figure 340: Database connection
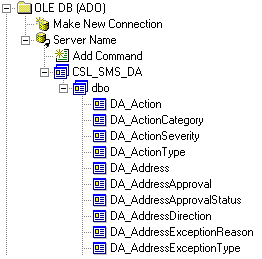
Figure 341: Links
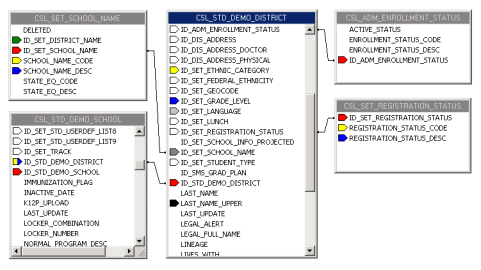
Figure 342: Fields

Figure 343: Change order
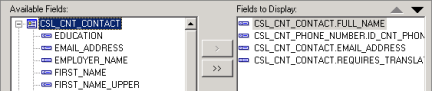
Figure 344: Group information

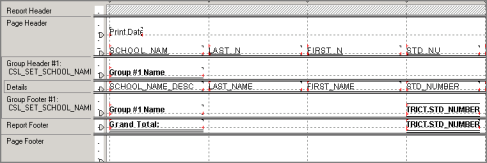
Figure 345: Design tab
Modifying Custom Reports (Database Tables)
If you have an existing report built directly on the database tables in PowerSchool SMS that requires some slight modification, you can customize the existing report, rather than create a new one.
When you customize this type of report, you can add or delete fields, change the order of columns, create groups and summaries, add formatting – all of the same features you use when creating a report from scratch.
To customize any reports that you have already created, download the report [>>], modify it using Crystal Reports, and then add the revised report back into PowerSchool SMS [>>].
You can repeatedly modify a report. For example, after you add a modified report to PowerSchool SMS, you can download it and modify it further.
Later, if you want to remove the modified report, you can revert to the original report. For more general information, see Reverting to an original report [>>].
Note: You must always customize an existing report by downloading and modifying it. You cannot create a new report and add it to PowerSchool SMS in place of a built-in report.
Running Database Table reports at the school level
Certain data that schools may need to view (such as CDM data) cannot be accessed in a school-level report. To resolve this situation, there are two options: running the report at the district level, or providing district-level access to school users.
|
1
|
Create the report in Crystal Reports by linking directly to the tables [>>]. |
|
2
|
When a school requires this information, run the report in Crystal Reports, setting a filter to reflect the specific school. |
|
3
|
Forward the report to the school. |
|
1
|
Create a role within the base district role specific to each school in the district that you want to be able to run district-level reports. Limit the scope of each role to a single school. Remove all permissions for the roles [>>]. |
|
2
|
Assign the new roles to the appropriate school users [>>]. |
|
3
|
Create the report in Crystal Reports by linking directly to the tables. Create one version for each school, and add a filter to each to limit the results to that particular school [>>]. |
|
4
|
Upload each report to PowerSchool SMS. Assign view-only permission to the role that matches the version of the report [>>]. |
|
5
|
Provide the user account information and the log-on information for the database to the school users. |

www.powerschool.com
Tel: 866-434-6276
Email: smssupport@powerschool.com
Copyright 2015-2016 PowerSchool Group LLC and/or its affiliate(s). All rights reserved. All trademarks are either owned or licensed by PowerSchool Group LLC and/or its affiliates.
