|
1
|
In the Admin menu, click District Setup. The District Setup page appears. |
|
2
|
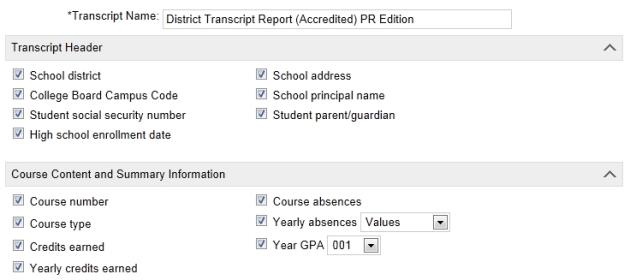
Under Transcript Options/and Permanent Record Setup, click Transcript Options . The Transcript Options page appears [Figure 231]. |
|
3
|
In Transcript Name , enter the name shown on the transcript. |
|
4
|
Under Transcript Header, select the items that appear in the header of transcripts [Figure 231]. |
|
=
|
School District: To show the name of the district between the school name and the transcript name. |
|
=
|
College Board Campus Code (CBCC): To show the student's home school CBCC number in the School Information section of the transcript. The CBCC number is assigned to each school by the college board. Students present the number when they are evaluated in any of the college board exams. Note: If a student does not have a home school, a transcript does not print for that student |
|
=
|
Student Social Security Number: To show the student's social security number in the Student Information section of the transcript. |
|
=
|
High School Enrollment Date: To show the student's high school enrollment date in the Student Information section of the transcript. |
|
=
|
School Address: (Permanent Record only) - To show the school's address in the Student Information section of the transcript. |
|
=
|
Student's Address: (Non-Permanent Record only) - To show the student's address in the Student Information section of the transcript. |
|
=
|
School Principal Name - To show the principal's name in the School Information section of the transcript. The principal name is from the student's home school. Note: If a student does not have a home school, a transcript does not print for that student. |
|
=
|
Student Parent/Guardian: To show name of the student's parent or guardian in the Student Information section of the transcript. |
|
5
|
Under Course Content and Summary Information, select the information to display on the transcript [Figure 231]. |
|
=
|
Course Number: To show the number of each course, in addition to the course short name. |
|
=
|
Course Type: To show the type of each course, such as “H” for honors. |
|
=
|
Credits Earned: To show the credits the student earned for each course. Selecting this option adds a credits column labeled Cr to the Course Information section of the transcript. |
|
=
|
Yearly Credits Earned: To show the credits the student earned each year. |
|
=
|
Course Absences:To show the number of absences the student had in each course. Selecting this option adds an absences column labeled Abs to the Course Information section of the transcript. |
|
=
|
Yearly Absences : To show the number of absences the student had each year. |
|
=
|
Permanent Record only - Select from the dropdown to show this information by value or by occurrence. Note: Prior to the conversion to Permanent Record, the options in this dropdown were determined by the Attendance settings on the District Preferences page. To change these options, use the PR by Year or PR by Year & Term page. |
|
=
|
Yearly GPA: To show the grade average for a year. Note: A year GPA is based on a cumulative GPA formula, but only includes the grades for a single year and only those grades that are marked to be used in cumulative GPAs. |
|
=
|
Permanent Record only - Year GPA: Select the year GPA from the dropdown. |
|
6
|
Under Subject Areas, choose the subjects area that transcripts include. Only courses with these subject areas are shown on transcripts. |
|
7
|
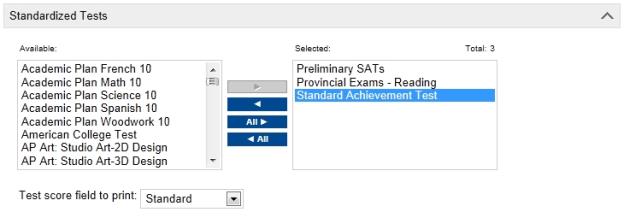
Under Standardized Tests [Figure 232], determine the standardized tests that can be shown on transcripts, the order that they appear, and the exact score that is used. Note: Selecting tests does not mean that they will always be shown on transcripts. It means that the tests appear in the Print Options dialog when transcripts are being printed, and the person printing the transcript can choose whether to include the test. |
|
8
|
From the Test Score Field to Print dropdown, select the field that is used as the source of the test score. For example, options include Raw, Scaled, Standard, and so on. |
|
9
|
Permanent Record only - Under Student Profile, select the overall graduation information that should appear on the student transcripts: |
|
=
|
Coursework Completion Date : To show the date that the student completed coursework required for graduation. |
|
=
|
Grant Eligibility: To show whether the student is eligible to receive a grant from the state. |
|
=
|
Credits Information: To show the total credits that the student earned for all years, as well as which credits were state credits and which were local credits. |
|
=
|
Ranking Information: To show the student's class rank, the number of students in the class, and the date that the ranking was done. |
|
10
|
Permanent Record only - Under Cumulative GPA, select the cumulative GPA calculation results you want to show on student transcripts. To add the cumulative GPAs, select from the Available list, then use the arrow buttons to move them to the Selected list. |
|
11
|
Non-Permanent Record only - Under Graduation Information, select the overall graduation information that is shown on transcripts. |
|
=
|
Coursework Completion Date: To show the date that the student completed coursework required for graduation. This comes from Coursework Completion Date field on the Historical page. |
|
=
|
Grant Eligibility: To show whether the student is eligible to receive a grant from the state. This comes from the Grant Eligibility field on the Historical page. |
|
=
|
Credits Information: To show the total credits that the student earned for all years, as well as which credits were state credits and which were local credits. This information comes from the Total Credits (Earned, State, and Local) fields on the Historical page. |
|
=
|
Cumulative GPA: To display the student's unweighted grade average for all years. This comes from the Cumulative GPA (Unweighted) field on the Historical page. |
|
=
|
Cumulative Weighted GPA: To display the student's weighted grade average for all years. This comes from the Cumulative GPA (Weighted) field on the Historical page. |
|
=
|
Ranking Information: To display the student's class rank, the number of students in the class, and the date that the ranking was done. This comes from the Class Rank, Out Of, and Class Rank Date fields on the Edit Historical Year page for the most recent historical year. |
|
12
|
Under General Information, select the other information that appears on transcripts. |
|
=
|
Date of Signature: To to show an area for the official who signs the transcript to write a date. Note: Select this option only if you also select Official Signature. |
|
=
|
Official Signature: To show an area for an official to sign the transcript. |
|
=
|
Footer Information - To show footer information, such as the student's name, the page number and total pages, and the date that the transcript is printed. |
|
=
|
Grading Tables: To show a legend with the grading table. If you select this, enter the legend text, for example: |
A - 90-10 E - Excellent
B - 80-89 S - Satisfactory
C - 75-79 N - Needs Improvement
D - Below 70 U - Unsatisfactory
|
=
|
District Message: Select and enter a message to show a district-wide message on all transcripts, for example:
August 19 is the last day to change electives.
Note: Schools can also add a message when they print their student transcripts. |
 You can do this if your role is District Administrator.[DA]You can do this if your role is School Administrator.[SA]
 You can do this if your role is District Administrator.[DA]You can do this if your role is School Administrator.[SA]


