Open topic with navigation
Define Address Data Setup List
Note: Setup Lists [>>] appear in both the active calendar and the planning calendar [>>]; therefore, when you add or update a setup list in one calendar, that Setup List also appears in the other calendar.
For Address Validation to work correctly, there are three address setup list items that must be in place in PowerSchool SMS in a specific format. These setup list items are:
|
=
|
Address Type: Ensure the Short Code is entirely in upper case (for example, the short code for street must be entered as "ST", not "st" or "St"). Note: AlthoughPowerSchool SMS comes with many street types already set up in the Address Type setup list (such as Street, Avenue, Crescent, and so on), you will likely need to add some street types for the particular city in which the schools in your district reside. Also ensure all the applicable school categories are selected |
|
=
|
Country: Ensure the Description for United States is "USA" and for Canada it is "Canada". |
|
=
|
State or Province setup list: ensure the StateShort Code is in upper case; for example, TX, TN, BC. |
|
1
|
In the Admin menu, click District Setup. The District Setup page appears. |
|
2
|
Under District, click Setup Lists. The Setup List window appears. |
|
3
|
Click a setup list under Address Data. The applicable setup list page appears. The Setup List page appears. |
|
4
|
To add a setup list item, click Add. Complete the required fields and click OK. |
|
=
|
To edit a setup list item, click the list item name under Description. Make the necessary changes and click OK. |
|
=
|
To delete a setup list item, click Delete. Select the items to be deleted and click OK. |
|
=
|
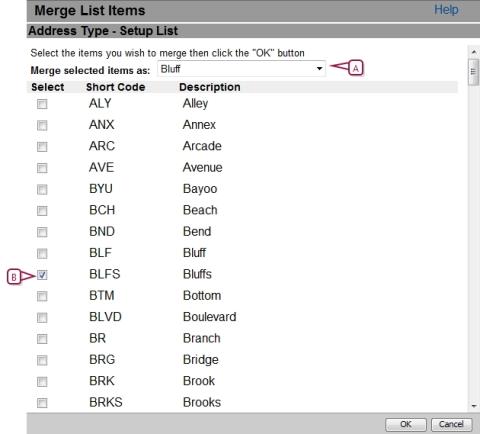
To merge a setup list item, click Merge. On the Merge List Items page [Figure 303], select the item to merge to in the dropdown box and select the items you want to merge. Click OK. |
|
=
|
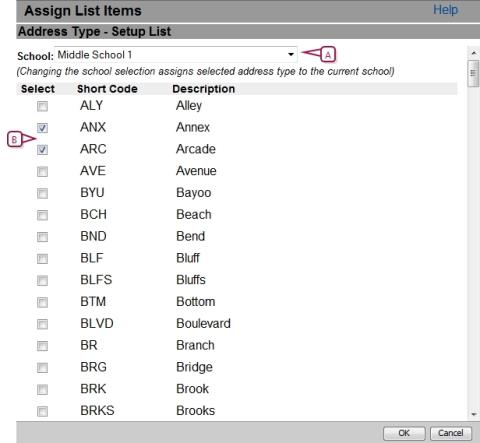
To assign a setup list item, click Assign. On the Assign List Items page [Figure 304], in the dropdown box, select the school to assign the item to and select the items you want to assign . Click OK. |
|
5
|
Click Return to change the next setup list. |
Define address exception reasons
In general, students enroll in the school that serves the geographical area where they live — their zoned school. If a student wants to enroll in a school outside their geographical area, users can select a reason the student is enrolling in an out-of-zone school.
If the Require district approval for address exceptions option is selected in general preferences, then an exception reason must be specified for all out-of-zone enrollment requests. The exception reasons are defined in the Exception Reason setup list.
You can manually set up address exception reasons or import them. The following procedure describes the process for manually defining exception reasons. For information about importing setup list items, see Overview of Import/Export [>>].
|
1
|
IIn the Admin menu, click District Setup. The District Setup page appears. |
|
2
|
Under District, click Address Validation Setup. The District Setup page appears. The Address Validation Setup page appears. |
|
3
|
Under Step 2, click Address Exception Reasons. The Address Exception Reason – Setup List page appears. |
|
4
|
To add an address exception reason, click Add.... In the Add List Item dialog, enter the required information and click OK. |
|
=
|
To delete an address exception reason, click Delete. On the Delete List Items page, select the item you want to delete and click OK. |
|
=
|
To merge an address exception reason, click Merge. On the Merge List Items page, select item to merge to in the dropdown box and select the items you want to merge Click OK. |
|
=
|
To edit an address exception reason, select the code link under Description. On the Edit List Item page, change the information as required and click OK. |
Set up Geocodes for address validation
In PowerSchool SMS, geocodes are geographical identifier codes that are used to define geographical areas. When you set up address ranges for Automatic Address Validation, you associate each geocode with specific address ranges. Then, when you set up the Geocode Map, you assign geocodes to entry grade levels at specific schools. Students whose addresses are within the range associated with a specific geocode are considered in zone for the school that is assigned that geocode.
Geocodes are defined in the Geocode setup list. Before you can assign geocodes to address ranges and schools, you must ensure that all the geocodes in your district have been added to the Geocode setup list.
Since geocodes can include letters, as well as numbers, they are sorted by digit. For example, 1, 2, and 12 are sorted 1, 12, 2. To ensure geocodes sort in a logical order, pad geocodes with leading zeros to make them the same length. For example, if geocodes can have up to four digits, enter 1 and 2 as 0001 and 0002.
You can enter geocodes manually or import them. The following procedure describes the process for manually defining geocodes. For information about importing, see Overview of Import/Export [>>].
|
1
|
In the Admin menu, click District Setup. The District Setup page appears. |
|
2
|
Under District, click Address Validation Setup. The Address Validation Setup page appears. |
|
3
|
Under Step 2, click Geocodes. The Geocode – Setup List page appears. |
|
4
|
To add a geocode, click Add.... In the Add List Item dialog, enter the required information and click OK. |
|
=
|
To edit a geocode, select the code link under Description. On the Edit List Item page, change the information as required and click OK. |
|
=
|
To delete a geocode, click Delete. On the Delete List Items page, select the item you want to delete and click OK. |
|
=
|
To merge a geocode, click Merge. On the Merge List Items page, select the item to merge to in the dropdown box and select the items you want to merge. Click OK. |
Figure 303: Merge Setup List

|
A
|
Select the item to merge |
|
B
|
Select the item(s) to be merged to the selected item. |
Figure 304: Assign Setup List

|
A
|
Select the school to assign the setup items to |
|
B
|
Select the items to be assigned to the school. |

www.powerschool.com
Tel: 866-434-6276
Email: smssupport@powerschool.com
Copyright 2015-2016 PowerSchool Group LLC and/or its affiliate(s). All rights reserved. All trademarks are either owned or licensed by PowerSchool Group LLC and/or its affiliates.
 You can do this if your role is District Administrator.[DA]
 You can do this if your role is District Administrator.[DA]


