Open topic with navigation
Selecting courses for an academic plan version
An academic plan's structure consists of a list of courses from which earned credits would fulfill the plan's requirements. These selected courses, a subset of the courses available in the district's course catalog for the active year [>>], are organized into one or more course groups to each of which a minimum number of credits is assigned. Typically, a course group contains a list of courses in a single field of study, such as Science, Humanities, or Physical Education, or a single type, such as Electives. The total of all credits of a plan version's course groups must equal the credits assigned to that plan version.
A course group can consist of one or more course subgroups, which can be useful for organizing a course group's courses by such criteria as grade level, difficulty, or specialization; for example, the plan could require a student to take 6 credits of Science (the course group), of which 3 credit must be from a Biology course (the subgroup). A course group can hold up to 6 levels of subgroups. The total of all credits of a group's subgroups must equal the credits assigned to the parent group. Note: If a course group contains subgroups, we recommend organizing all courses in the course group into subgroups; in other words, organize all courses into the same level of grouping.
You select courses for inclusion in a group or subgroup by searching the course catalog and selecting from the search results [>>].
|
1
|
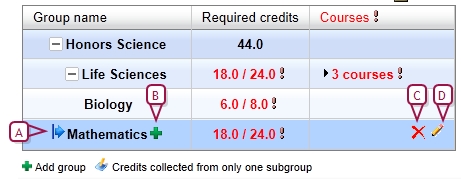
On a plan version's Academic Plan Setup page [>>], on the Plan Structure tab, in the Group name column, move the cursor over a plan version's name and click the Add group icon [Figure 316]. The Group Setup page appears [Figure 317]. |
|
=
|
To edit a group, move the cursor over the group's row and click the edit icon [Figure 316]. |
|
=
|
Note: To change the position of a group in the hierarchy of groups and subgroups, you can drag the group to another position (click on the group's move icon [Figure 316] and hold the button down as you move the cursor). |
|
2
|
Enter or change the information, which includes: |
|
=
|
Group name: The name of the group or subgroup must be unique to this plan version. |
|
=
|
Required credits: The minimum number of credits the student must earn from this group or subgroup to meet the plan version's requirements. |
|
=
|
Maximum credits: The total number of credits the student can earn from this group or subgroup to meet the plan version's requirements. PowerSchool SMS considers any credits earned beyond this total to be surplus [see Earning credits on an academic plan >>]. If this value is left blank, PowerSchool SMS considers the Required credits to equal the Maximum credits. |
|
=
|
All associated sub-groups: [Default] Enables students to earn credits from any of the group's subgroups. |
|
=
|
Only one associated sub-group: Considers credits from only one of the group's subgroup as earned, even where the student has earned credits from several subgroups. For example, in a World Languages group with two subgroups, French and Spanish, and Required credits of 2.0, a student needs to earn 2.0 credits in either French or Spanish. |
|
=
|
[Optional] Course group option: If the option Enable course group option on the Group Setup page is selected on the Optional Preferences page [>>] for this academic plan, PowerSchool SMS displays this drop down with a number of course attributes to choose from. For the purposes of calculating credits on the student Academic Plan page, you can select an attribute and group together the courses by that attribute (for example, you may want to ensure that all contributing course credits for a group have the same course state number). On the Academic Plan Setup page and on the student Academic Plan page, an indicator appears beside courses that are grouped by attribute. Note: This field is only editable when the group has no associated subgroups. Also, If you select a course group option for a group with no subgroups, then later add a subgroup, PowerSchool SMS sets the course group option to N/A for the group and applies the group's course group option to the subgroup. For example, let's say there is a Math group with no subgroups and you select the course group option "State Number". If you later add an Algebra subgroup to the Math group, PowerSchool SMS sets the course group option to “N/A” for the Math group and the course group option to "State Number" for the Algebra subgroup. |
|
=
|
Or, click Apply to add or change the group's selected courses [>>]. |
|
1
|
On a plan version's Academic Plan Setup page [>>], on the Plan Structure tab, move the cursor over the group's row and click the edit icon [Figure 316]. The Group Setup page appears [Figure 317]. |
|
2
|
In the Course Search section, use a Basic or Detail search to generate a relevant list of courses from the district's course catalog. PowerSchool SMS runs the search and displays matching courses (if any) under Search Results. |
|
=
|
Perform the search using the same methods as a Basic [>>] or Detail [>>] search for students. You can save the results of a search, or save the search criteria for re-use as a favorite search. |
|
=
|
Course name is case insensitive (that is, entering english for the course name will produce courses named English and english). |
|
=
|
Note: The maximum number of course records you can select in the course record search results at one time depends on the browser [>>] you are using, as follows: |
|
=
|
Microsoft IE 8: 350 or 500 course records, depending on settings (search the Knowledge Base for further information IE 8 settings) |
|
=
|
Other browsers (such as Firefox or Safari): 1000 course records |
|
3
|
In the Search Results section, select one or more courses. |
|
=
|
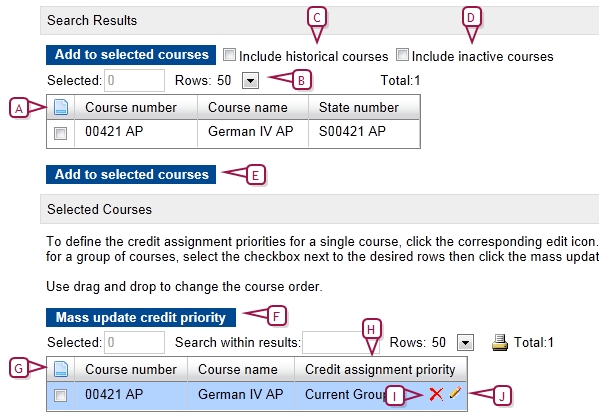
To see historical courses in your search results, click Include historical courses [Figure 317]. When you select this option, PowerSchool SMS saves the setting and the option remains selected every time you open this page, until you deselect it. |
|
=
|
To see in your search results courses from the district catalog that are flagged as inactive, click Include inactive courses. When you select this option, PowerSchool SMS saves the setting and the option remains selected every time you open this page, until you deselect it. |
|
4
|
Click Add to selected courses. The course(s) appears in the Selected Courses panel [Figure 317]. |
|
=
|
To remove a course from the Selected Courses list, move the cursor over the course's row and click the delete icon [Figure 317]. |
Figure 316: Course groups

Figure 317: Group setup page

|
A
|
Search Results: A list of courses generated from a search of the course catalog. |
|
B
|
Rows: Indicates the number of course records displayed in the search results grid. |
|
C
|
Page control: Use the arrows to move between pages in the course search results grid.
|
|
D
|
Include historical courses: Select to include historical courses in the course search results. |
|
E
|
Add to selected courses: Adds the course(s) selected to the Selected Courses list.
|
|
F
|
Mass update credit priority: Enables you to set the credit assignment priority for selected courses [see >>]. |
|
G
|
Selected Courses: The courses selected for this group or subgroup. |
|
H
|
Credit assignment priority: Indicates the course's credit assignment priority in this group [see >>]. |
|
I
|
Delete icon: Removes the course from the group's list. |
|
J
|
Edit icon: Enables you to set the course's credit assignment priority [>>]. |

www.powerschool.com
Tel: 866-434-6276
Email: smssupport@powerschool.com
Copyright 2015-2016 PowerSchool Group LLC and/or its affiliate(s). All rights reserved. All trademarks are either owned or licensed by PowerSchool Group LLC and/or its affiliates.


