Open topic with navigation
Running or scheduling an import
You can import data using either the Import Wizard or the Schedule Import feature. Which method you choose depends on the data you want to import. To import Student demographics, Setup Lists, test scores (legacy only), and CDM data, use the Import Wizard. For all other types of data, use Schedule Import.
Importing data using the Import Wizard
Use the Import Wizard to import only student demographic data and student test scores. In other words, use this import method with templates created using the following record types:
|
=
|
CDM Student Chronological |
|
=
|
CDM Student Repeating Group |
|
=
|
Student Test Scores (legacy Tests component only - see note below) |
Note: The record type Student Test Scores is used to import test results for test definitions that were created using the legacy Tests component. To import test results for test definitions that were created using the Test Management component, use a Scheduled Import. See Importing data using scheduled imports [>>].
For a description of the fields that correspond to these record types, see Student Demographics [>>].
You cannot use the Import Wizard to import other types of data, such as buildings, courses, or historical information. For these data types, see Importing data using scheduled imports [>>].
Before you import any file:
|
=
|
Copy the import file to the csl/opendistrictclient/ascii/importfiles folder on the PowerSchool SMS web server. |
After the import, the following occurs:
|
=
|
The Import Errors page opens. |
|
=
|
If errors or warnings occurred, the records that contain errors or warnings are copied to a RESULT file in both the ErrorFiles folder and the ImportFiles folder. |
|
=
|
The imported file moves to the ArchiveFiles folder in the csl\opendistrictclient\ascii folder on the server. |
For information about errors and warnings, see Fixing errors and warnings in the Import Wizard [>>].
Note: Ensure the file you want to import is in the following location on the PowerSchool SMS web server, or that the file will be in this location when the import occurs: csl\opendistrictclient\ascii\importfiles.
|
1
|
In the Admin menu, click District Setup. The District Setup page appears. |
|
2
|
Under Tools, click Import. The Import page appears. |
|
3
|
Click Start Import Wizard. The Introduction page appears. |
|
4
|
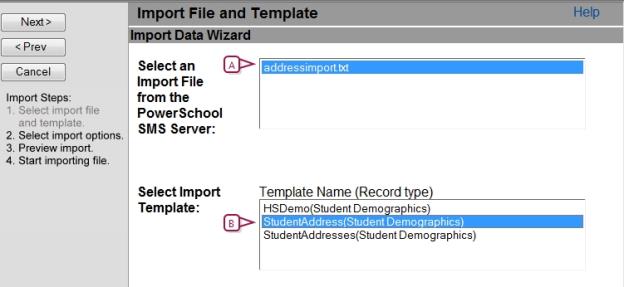
Click Next. The Import File and Template page appears [Figure 370]. |
|
5
|
Click an import file and a template. Note: If a template does not exist for the file you are importing, you need to create the template [>>]. |
|
7
|
Set options for the import, which depend on the type of data being imported: |
|
=
|
If you are importing student data, on the Student Record Update Option page, choose one of the following: |
|
=
|
To import all records as new records, Click Add new students only. Note: If the student number of an import record matches one in PowerSchool SMS or if the student number field is empty, the record is imported, a new student number is generated, and a warning is created in the Import Error Report page. See Fixing errors and warnings in the Import Wizard [>>]. |
|
=
|
To update only student records that already exist in the database, Click Update existing students only. Note: If the student number, first name, last name, and birth date of an import record match those in PowerSchool SMS, the record is updated, including any blank fields. If they do not match, the record is noted on the Import Errors Report page and is not imported. See Fixing errors and warnings in the Import Wizard [>>]. |
|
=
|
If you are importing tests, on the Standardized Test Score Options page, under Select Test Session, click the date when the students took the test. |
|
9
|
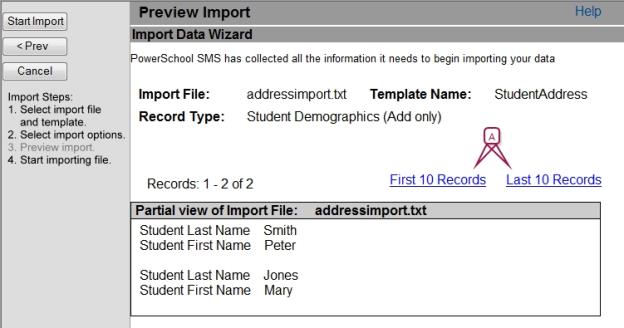
Review the information before importing it. |
Figure 370: Import File and Template
|
B
|
Click the import template. |
Figure 371: Preview Import
|
A
|
Click to view the first or last 10 records in the import file. |
Fixing errors and warnings in the Import Wizard
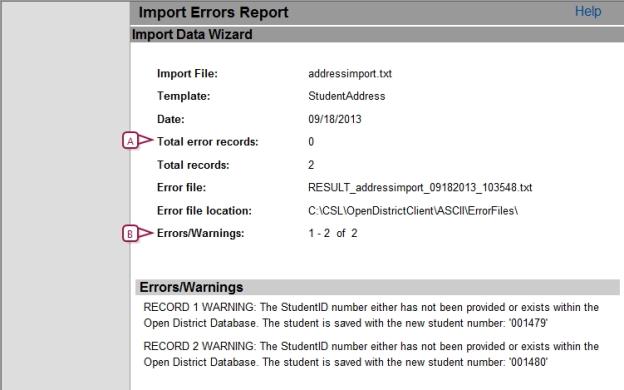
In the Import Wizard, errors and warnings display for different reasons. Errors occur when the record cannot be imported; for example, when date or phone information is not in the correct format. Warnings occur when a field in your import file has more characters than the corresponding field in PowerSchool SMS, or if a student number already existed in the database and the import generated a duplicate student number.
After an import, the Import Errors page displays. [Figure 372]
|
1
|
Review the errors and warnings. If you have more than 10 errors, click Last 10 Errors to view them. |
|
2
|
Navigate to the ImportFiles folder in the csl\opendistrictclient\ascii folder on the server, and locate the file containing the problem records. Note: Files containing problem records have file names with the format RESULT_ImportedFileName>_MMDDYYYY_nnnnnn.txt where ImportedFileName is the name of the imported file, MMDDYYYY is the month, day, and year, and nnnnnn is an automatically generated number. |
|
3
|
Open the file with a third-party tool, such as Notepad, and fix the problems with the records. Note: If you are unable to fix the error in the third-party tool, fix it in the original file then resave the file as a text file, using the same name as the original text file. |
|
4
|
Close the Import Data Wizard window. |
Figure 372: Import Errors Report
|
A
|
The total number of errors excluding warnings. |
|
B
|
The total number of errors and warnings. |
Verifying the import
After you successfully import a file, verify that the information displays correctly in PowerSchool SMS.
For example, if you imported medical information for a student, open a student's record and ensure that the Medical section of the Personal page displays the new information you imported.
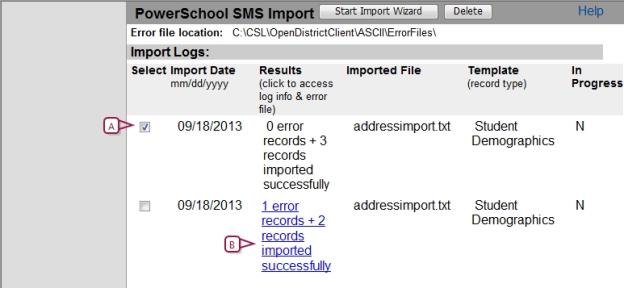
Working with Import Wizard logs
The import log records information about all imports so that you can view and correct any errors. After the errors are fixed, you can delete the logs.
|
1
|
In the Admin menu, click District Setup. The District Setup page appears. |
|
2
|
Under Tools, click Import. The Import page appears. |
|
3
|
Under Import Log [Figure 373], to view a log, click the link in the Results column. |
|
=
|
To delete a log, select an import log to delete and click Delete. Click OK. |
Figure 373: Import log
|
A
|
To delete a log, select it and click Delete. |
|
B
|
Click the link under Results to see more detail. |
Importing data using scheduled imports
Use scheduled imports to import data that corresponds to templates created using the listed record types:
|
|
|
|
|
|
|
|
|
|
|
|
=
|
Student Course Requests |
|
|
|
|
|
|
|
|
|
|
=
|
Historical Graduation Information |
|
You cannot use scheduled imports to import student demographics, test scores, Setup Lists, or data created using CDM. For these data types, see Importing data using the Import Wizard [>>].
Before you import any file:
|
=
|
Copy the import file to the csl\opendistrictclient\ascii\importfiles folder of the PowerSchool SMS web server. |
Each scheduled import is considered a job, which can be run immediately or at a specified time. You can create multiple import jobs, where each job has its own name and timing. Multiple jobs can use the same template, but the import file must have a unique name.
Ensure the file you want to import is in the following location on the PowerSchool SMS web server, or that the file will be in this location when the import occurs: csl\opendistrictclient\ascii\importfiles.
|
1
|
In the Admin menu, click District Setup. The District Setup page appears. |
|
2
|
Under Tools, click Schedule Import. The Schedule Import page appears. |
|
3
|
To create a scheduled import, click Add Scheduled Import from the Actions menu. The Add/Edit Scheduled Import page appears. |
|
=
|
To change a scheduled import, click the name of the import job. The Add/Edit Scheduled Import page appears. |
|
=
|
To delete a scheduled import, select the checkbox next to the import job. From the Actions menu, click Delete Scheduled Import. Skip the remaining steps. |
|
4
|
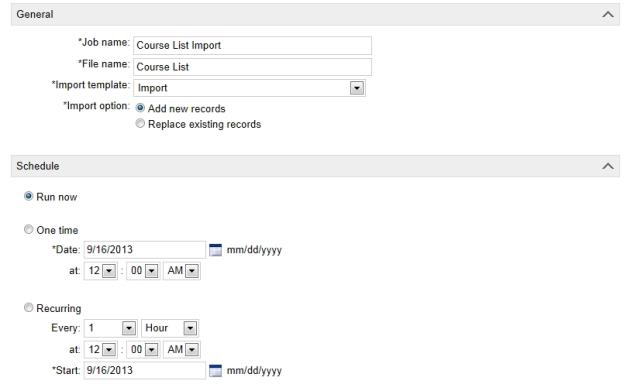
Under General [Figure 374], identify the import, which includes: |
|
=
|
Job Name: A unique name for the import. If you are performing more than one import, each job name must be different. |
|
=
|
File Name: The name of the file you are importing, including the name and extension but not the path. For example, enter "tests123.txt". |
|
=
|
Import Option: If the imported data adds new records to PowerSchool SMS, select Add new records. If the imported data changes existing records in PowerSchool SMS, select "Replace existing records". Note: When you replace existing records, you can only update optional fields. If you try to change any of the required fields, a new record is added. |
|
5
|
Under Schedule [Figure 374], to import the file immediately, select Run now. |
|
=
|
To run the import once for a scheduled time, select One time.Enter the date and the time the import is to be run. |
|
=
|
To run the import on a regular schedule, select Recurring. Specify the interval and when the imports begin. |
Figure 374: General
Troubleshooting scheduled imports
After a scheduled import runs, one of the following statuses displays on the Schedule Import page:
|
=
|
Completed - this status indicates that all records were imported |
|
=
|
Completed with Errors - this status indicates that some records were imported |
|
=
|
Failed - this status indicates that no records were imported |
Note: Regardless of the status of the scheduled import, the import file is moved to the following folder: CSL\OpenDistrictClient\ASCII\Archive Files.
Errors generated during a scheduled import are written to error logs on the PowerSchool SMS web server. Which log the error is written to depends on where the error occurred (in the import file or the import template), which is indicated by the status of the import as follows:
|
=
|
If the status after importing is "Completed with Errors", there are errors in the import file and the errors display in the following file: CSL\OpenDistrictClient\ASCII\ErrorFiles. |
|
=
|
If the status after importing is "Failed", there are errors in the import template and these errors display in the PowerSchool.TaskManager.Service.Log located in CSL\OpenDistrictClient\SMS\SMSBusinessObjects\Log. |
|
1
|
sign in to the PowerSchool SMS web server. |
|
2
|
Navigate to C:\CSL\OpenDistrictClient\ASCII\ErrorFiles and open the .log file. |
|
3
|
Review the error messages. |
|
4
|
Navigate to C:\CSL\OpenDistrictClient\ASCII\ArchiveFiles and make the corrections in the import file based on the messages in the error log. |
|
5
|
Copy the import file from c:\CSL\OpenDistrictClient\ASCII\ArchiveFiles to C:\CSL\OpenDistrictClient\ASCII\ImportFiles. |
|
6
|
Re-run the scheduled import [>>]. |
Warning: After you correct errors in an import file, ensure you select the import option Replace existing records when you re-run the import. Failure to do so could result in duplicate records in PowerSchool SMS.
|
1
|
Sign in to the PowerSchool SMS web server. |
|
2
|
Navigate to C\CSL\OpenDistrictClient\SMS\SMSBusinessObjects\Log. |
|
3
|
Open the PowerSchool.TaskManager.Service.log. |
|
4
|
Review the error messages. |
|
5
|
Sign in to the Template Editor. |
|
6
|
Select your import template and click Edit. |
|
7
|
Make corrections to the import template, based on the error messages in the PowerSchool.TaskManager.Service.log. |
|
8
|
Save the import template. |
|
9
|
Re-run the import [>>]. |
|
1
|
In the Admin menu, click District Setup. The District Setup page appears. |
|
2
|
Under Tools, click Schedule Import. The Schedule Import page appears. |
|
3
|
Click the import. The Edit Scheduled Import page appears. |
|
4
|
If the error occurred in the import file, select Replace existing records option. Note: Ensure you select this option. When there are errors in the import file, records without errors are imported anyway. If you select Add new records you could end up with duplicate records in PowerSchool SMS. |
|
=
|
If the error occurred in the import template, select Add new records option. |
|
5
|
Under Schedule, click Run Now. |

www.powerschool.com
Tel: 866-434-6276
Email: smssupport@powerschool.com
Copyright 2015-2016 PowerSchool Group LLC and/or its affiliate(s). All rights reserved. All trademarks are either owned or licensed by PowerSchool Group LLC and/or its affiliates.
 You can do this if your role is District Administrator.[DA]