Open topic with navigation
| Import/Export > Creating an import template with Template Editor
Creating an import template with Template Editor
To learn more about the Template Editor, see About the Template Editor [>>].
Starting the Template Editor and selecting the import file
Before you start Template Editor, copy the import file you created or edited in [>>] to the csl/opendistrictclient/ascii/importfiles folder on the web server. The import file then becomes available for use in Template Editor.
|
1
|
Log on to the PowerSchool SMS web server. Note: The user ID and password required to log on to the web server are specific to the machine, and are unrelated to your PowerSchool SMS user ID and password. |
|
2
|
From the Windows Start menu, click Programs>PowerSchool SMS>PowerSchool SMS Web>Template Editor or navigate to the csl\opendistrictclient folder, and double-click TemplateEditor.exe. The PowerSchool SMSASCII Template Editor Log On dialog appears |
|
3
|
Enter the appropriate User ID and Password. The Template Editor opens [Figure 357].
Notes: |
|
=
|
The user ID and password for Template Editor are the same as those for the PowerSchool SMS database and were set when the database was installed. To change this information, go to Add/Remove Programs, launch the database installer and select Update Database User Information. In the Change Database Account Information dialog, enter the new information. |
|
=
|
If you change the database user name and password, to ensure the connection is not broken between the database and web server, update the user ID and password in the following file: Inetpub\wwwroot\PowerSchoolSMS\sqldataprovider.config. |
|
4
|
To create a new template, click Start Template Wizard [Figure 357]. The Template Wizard - Introduction page appears. |
|
=
|
To edit an existing template, click a template, and then click Edit [Figure 357]. The Template Wizard - Introduction page appears. Note: Editing a template follows the same process as creating a template – you must go through all the same steps. |
|
=
|
To delete one or more existing templates, click a template or select multiple templates by pressing Shift+Click on the templates. Click Delete and click Exit [Figure 357]. Skip the remaining steps. |
|
5
|
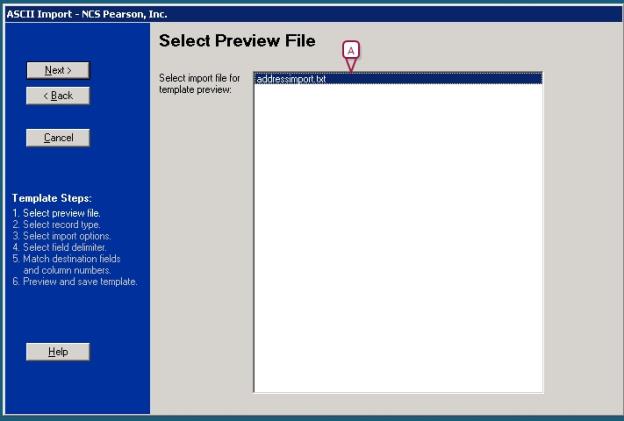
Click Next. The Select Preview File page appears [Figure 358]. |
|
6
|
Select the import file you will use to create the template and click Next. The Select Type Record to Import page opens [Figure 359]. |
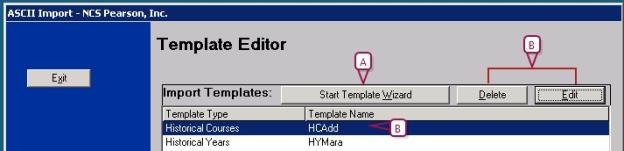
Figure 357: Template Editor
|
A
|
To create a new template, click Start Template Wizard. |
|
B
|
To delete or edit a template, select the template and click Delete or Edit. |
Figure 358: Select Preview File
Specifying a record type in Template Editor
Record types contain a list of predefined fields you import as a group. For a description of the available record types, see Creating an import template with Template Editor [>>]. For further information and a list of the fields in each record type, see Understanding record types [>>].
In the Template Editor, on the Select Type of Record to Import page [Figure 359]:
|
1
|
In Record Type [Figure 359], click the record type for the data you want to import. Note: Dropdowns are available when you select certain record types. For example, if you select the record type Student Test Results, you can select specific tests from the Student Test Results - Test Management dropdown. |
|
=
|
If you select Student Test Scores, |
|
a
|
Under Standardized Test Score Import - Legacy Test Scores, from the Test Name dropdown, select the name of the test for the test scores you are importing [Figure 359]. The names in this dropdown come from the Test Code setup list. The Select Standardized Test Score Options page displays [Figure 360]. |
|
b
|
Click the Test Grade Level and the Test Level (or difficulty) that you want. |
|
=
|
If you selected Student Test Results, |
|
=
|
If you selected Student Multi-Select, CDM Student Repeating Group, or CDM Student Chronological, |
|
a
|
Under CDM Import, from the Table Name dropdown, click the name of the multi-select list, repeating group, or chronological group [Figure 359]. |
|
=
|
If you selected Setup Lists, |
|
a
|
Under Setup Import, in the List Name dropdown, click the name of the setup list for the data you are importing [Figure 359]. |
|
=
|
If you select Student Test Results, |
|
a
|
Under Student Test Results - Test Management, from the Test dropdown, select the name of the test for the test results you are importing [Figure 359]. |
The Select File Format page opens [Figure 362].
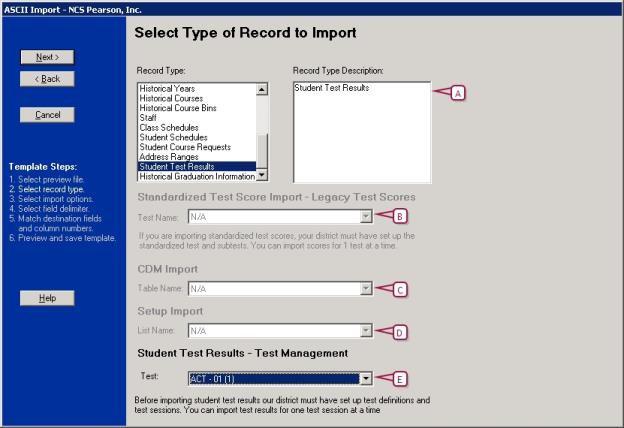
Figure 359: Select Type of Record to Import
|
A
|
When you select a record type, a description of the record type displays. |
|
B
|
Applies when the record type is Student Test. |
|
C
|
Applies when the record type is Student Multi-Select CDM Student Repeating Group or CDM Student. |
|
D
|
Applies when the Record Type is Setup List. |
|
E
|
Applies when the Record Type is Student Test Results. |
Figure 360: Select Standardized Test Score Options
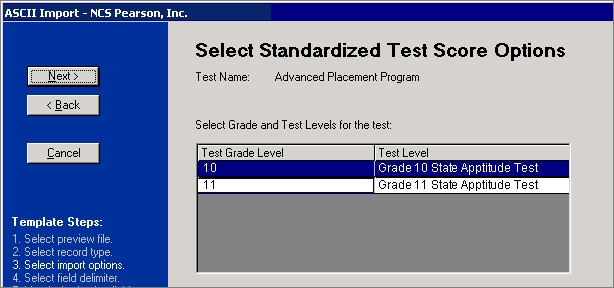
Note: The items shown on the Select Standardized Test Score Options page are the tests that have been added to the Standardized Tests page in PowerSchool SMS and correspond to the Test Name you selected on the Select Type of Record to Import page.
Figure 361: Select Test Session
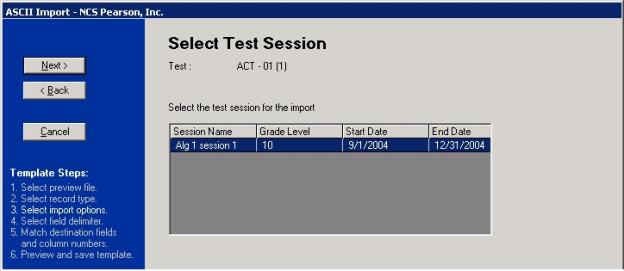
Note: The items shown on the Select Test Session page are the test sessions that have been added in PowerSchool SMS for the Test you selected on the Select Type of Record to Import page.
Selecting a File Format in Template Editor
On the Select File Format page [Figure 362],
|
1
|
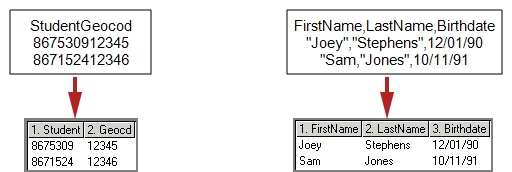
Under File Format, select either Delimited or Fixed-Length. |
| Format |
Description |
Example |
|
Delimited
|
Each column in the file is separated by a tab or comma.
|
"Joey", "Stephens", 12/01/90
|
|
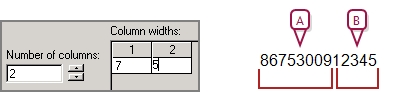
Fixed-length
|
Each column in the file has a specific number of characters.
|
867530912345
7 characters for the Student Number followed by 5 for the Geocode
|
|
2
|
Perform one of the following: |
|
=
|
Field delimiter: Select the character that separates fields in the import file: Comma (,) or a Tab. |
|
=
|
Text Qualifier: Select the character that surrounds text fields in the import file: Double quote ("), Single quote ('), or None. |
|
=
|
Column widths: Enter the number of characters used by each column. |
|
=
|
Number of columns: Select the number of columns |
|
3
|
If the import file starts with a row of headings for each column in the file, select First Row Has Column Names. |
|
4
|
Click Re-display As Columns. The Template Editor provides a partial preview of the fields [Figure 365]. |
|
5
|
Click Next. The Match import source with destination fields page opens [Figure 366]. |
Figure 362: Select File Format
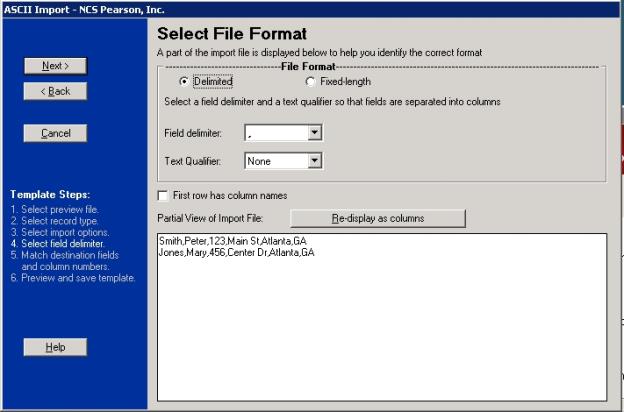
Figure 363: Delimiter
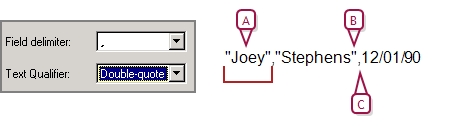
Figure 364: Fixed fields
|
A
|
1st column has 7 characters |
|
B
|
2nd column has 5 characters |
Figure 365: Partial preview
|
A
|
Fixed fields: If you selected First Row Has Column Names, the column labels are shown, in addition to the column numbers. |
|
B
|
Delimited fields: When you click Re-Display As Columns, the row are divided into separate fields |
Matching source and destination fields
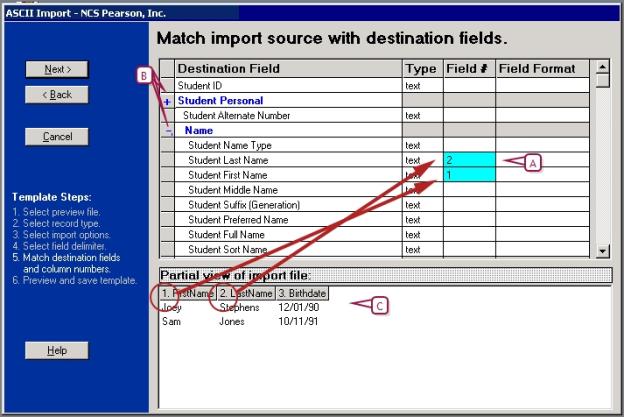
In the Template Editor, on the Match import source with destination fields page, the fields in your import file display under Partial View of Import File. Consider the specific fields in the PowerSchool SMS database that you want to import data into, noting that:
|
=
|
Fields highlighted in blue are required by the import. |
Required fields are determined based on what fields are required to update an existing record; additional fields may be required if you are adding a new record. For a list of required fields, see Understanding record types [>>].
|
=
|
fields are displayed at the top of the list. For a description of core fields, see Fields supported by record types [>>]. |
|
=
|
Custom fields created with Custom Data Management (Student Data) are displayed at the bottom of the list. |
|
=
|
You can click  to see fields inside a bold group header. For example, to find Student BirthDate, click next to Demographics. to see fields inside a bold group header. For example, to find Student BirthDate, click next to Demographics. |
|
1
|
On the Match import source with destination fields page, for each field in your import file, enter its column number next to its associated destination field [Figure 366]. |
|
2
|
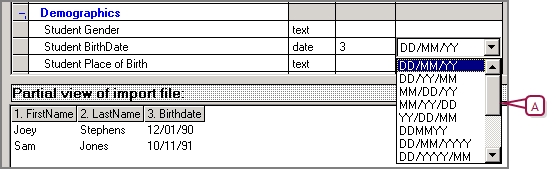
For date, birthdate and phone number fields, select a Field Format [Figure 367]. |
|
3
|
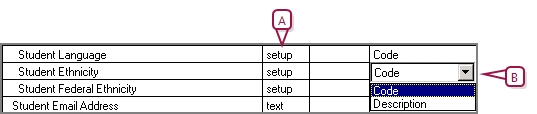
For any fields with the Type column set to Setup, from the Field Format dropdown, select either Code or Description to identify whether data is imported into the code or description field of each setup list item [Figure 368]. |
|
4
|
Click Next . The Preview and Save Import page appears. |
|
5
|
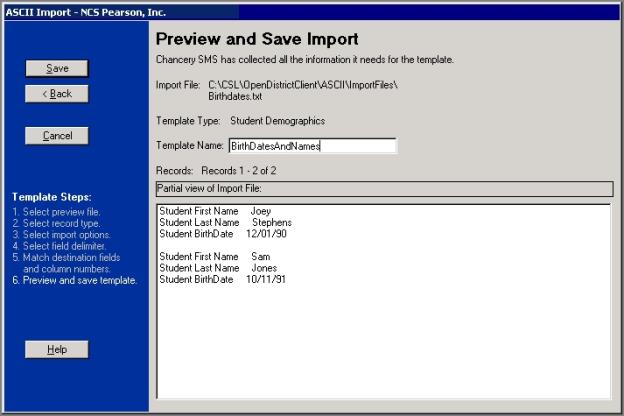
Review the partial preview of your imported file [Figure 369]. Note: If necessary, click Back to modify your settings. |
|
6
|
In the Template Name field, enter a unique template name of up to 30 characters and click Save. Note: If you are editing an existing template and you changed the Template Name, confirm whether you want to save over the existing template or save the revised template with a new name. |
|
7
|
Click Exit to close the Template Editor. |
Figure 366: Match import source with destination fields
|
A
|
Blue indicates a required field. |
|
B
|
Click the + and - signs to view and hide the fields inside bold group headers. |
|
C
|
Enter the column number next to the field you want to import the data into. |
Figure 367: File format
|
A
|
If the field is a birthdate or phone number, select a format. For information about formats see Working with Import Files [>>]. |
Figure 368: Setup format
|
B
|
If the field is a setup list, select Code or Description. |
Figure 369: Preview and Save Import

www.powerschool.com
Tel: 866-434-6276
Email: smssupport@powerschool.com
Copyright 2015-2016 PowerSchool Group LLC and/or its affiliate(s). All rights reserved. All trademarks are either owned or licensed by PowerSchool Group LLC and/or its affiliates.
 You can do this if your role is District Administrator.[DA]