[Applies to secondary schools only.]
PowerSchool SMS provides a generic report card template, which you can modify to meet your needs, or you can create a custom report card template.
Note: For instructions about how to update custom secondary report cards to use the new GPA/class rank reporting term functionality in PowerSchool SMS, contact Technical Support [>>].
At secondary schools, progress reports are set up just like, but separately from, report cards. As with report cards, each grade level can have only one progress report.
The grade levels you can choose from are defined on the Grade Levels Setup page.For information about grade levels, see Grade level setup [>>].
You can specify the columns and headings you want to show on the report cards and progress reports, as well as the order in which you want courses to display. In addition, you can specify which current year GPAs to show on report cards.
Although transcript setup is not directly tied to grading setup, an accurate transcript is the ultimate goal of all secondary grading. At the same time that report cards are set up, set up transcript settings and columns as appropriate for your school. For more information about setting up transcripts at the school level, see Setting up transcripts [>>].
1 | In the Admin, click Grading. The Grading page appears. |
2 | Under Step 6, clickReport Card and Progress Report Setup. The Report Card Setup page appears. |
3 | To add a report card, click Add Report Card from the Actions menu. The Edit Report Card page appears [Figure 223]. |
= | To add a progress report, click Add Progress Report from the Actions menu. The Edit Progress Report page appears. |
= | To edit a report card or progress report, click the name of the report card or progress report. The Edit Report Card [Figure 223] or Edit Progress Report page appears. |
= | To delete a report card or progress report, select the report card or progress report to delete. From the Actions menu, click Delete Report. Click OK and skip the remaining steps. |
4 | Define the report card [Figure 223]: |
= | Report card/Progress report name - Enter a name for the report card or progress report, such as "Grade 10 Report Card". |
= | Grade level -Identify the grades that this report card or progress report applies to. If you do not select all of the grades, ensure you create additional report cards and progress reports for those grades. After you select grade levels, the page refreshes to display all defined grade items. |
5 | Under Report Card Elements [Figure 224] or Progress Report Elements, select all of the elements that you want displayed on the report card or progress report. Note: Due to space restrictions, if you select to display course level information, you cannot also display grading table legends. To display policy information on the report card or progress report, enter it in the school message field. |
6 | Click OK. |
Figure 223: Report card/progress report
Figure 224: Report card/progress report elements
Cumulative Absences typically indicate absences during the selected grading period. However, if you add only one Cumulative Absences column and it is in the last grading period, the column indicates absences during the entire year.
Attendance numbers for a course only appear on the report card if the course appears on the report card.
Therefore, if a student transfers between courses, the report card displays both courses - and absences in them - only if the student receives a grade for both courses. Similarly, if a student withdraws, the report card displays the course - and absences in it - only if the student receives a grade for the course.
You can specify the order that courses appear on report cards and progress reports.
1 | In the Admin menu, click Grading. The Grading page appears. |
2 | Under Step 6, clickReport Card and Progress Report Setup. The Report Card Setup page appears. |
3 | To edit a report card or progress report, click the name of the report card or progress report. The Edit Report Card or Edit Progress Report page appears. |
4 | Under Report Card Elements or Progress Report Elements, to sort courses: |
= | Alphabetically by course name, select Course Name from the dropdown. |
= | Alphabetically by course number, select Course Number from the dropdown. |
= | By meeting pattern, select Meeting Pattern/Scheduling Term or Scheduling Term/Meeting Pattern from the dropdown. |
= | Selecting Meeting Pattern/Scheduling Term sorts by meeting pattern first and then by term, so you would see the course in period 1 for term 1, then the course for period 1 in term 2. |
= | Selecting Scheduling Term/Meeting Pattern sorts by term first and then by meeting pattern, so you would see the courses for all periods in term 1 and then the courses for all periods in term 2. For information about meeting patterns, see Setting up meeting patterns [>>]. |
Notes:
= If a class is assigned to more than one term, the course is sorted according to the current term for the current grading period.
= If a class has a different meeting pattern in each term, courses are sorted according to the meeting pattern that currently applies, e.g., in semester 1, the course is sorted according to the meeting pattern assigned to the class for semester 1 and, in semester 2, according to the meeting pattern assigned to the class for semester 2.
= If a class is assigned to more than one meeting pattern within the same term, the course is sorted based on the earliest occurrence of the class and subsequent occurrences of the class are ignored. For example, if a class is assigned to meeting pattern 1 that meets in Period 1 on Mondays and meeting pattern 4 that meets in Period 4 on Wednesdays, the course is sorted according to Period 1 on Monday only.
= If a school has more than one term set defined, terms are sorted by the number of terms in the term set (smallest to biggest), by the term number, and then by term set name. For example, a full year term with 1 term would be displayed first and a term set with 2 terms would sort next with semester 1 coming before semester 2.
5 | If you want to display meeting pattern and term on the report card/progress report, under Course Information, select Meeting Pattern and Scheduling Term. |
6 | Click OK. |
You can specify which current year GPAs to show on the report card. Current year GPAs apply only to report cards, not to progress reports. For both report cards and progress reports, you can specify which columns and columns headings to display.
To define GPAs, columns and headers:
1 | In the Admin menu, click Grading. The Grading page appears. |
2 | Under Step 6, click Report Card and Progress Report Setup. |
3 | 
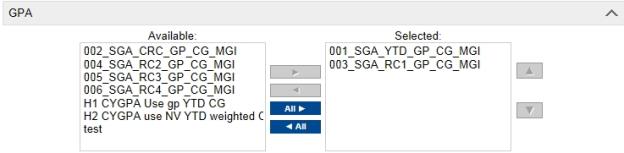
On the report card, select one or more current year GPAs in the Available list and click ![]() The current year GPAs in the Available list are the current year GPAs set up for your school. See About Grade Point Averages [>>]. |
4 | To edit a report card, click the name of the report card. The Edit Report Card page appears. |
5 | To change the order in which the GPAs appear on the report card, change their order in the Selected list [Figure 225]. To move a GPA up or down, in the Selected list, click the GPA you want to move and click the up or down arrow. Note: If your current year GPA definition is set up to calculate for a specific report card grading period (for example, grading period "Report Card 1"), remember to remove the GPA from the report card setup when it is no longer that grading period. This is because if you are now in a new grading period (i.e."Report Card 2") but you have not removed the current GPA for the Report Card 1 grading period, it will still appear on the student's report card. |
6 | 
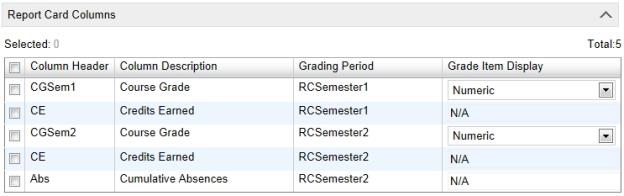
Under Report Card Columns [Figure 226] or Progress Report Columns, to provide labels for the columns on the report card or progress report |
= | Column Header - Enter a label or use the grade item code that appears by default. |
= | Grade Item Display - If you defined a numeric grading table and set the grade to display to Letter Grade or Graphic Symbol, you can use the Grade Item Display setting to specify whether you want to display the numeric value, the equivalent grade value, or both for the grade item. For more information about grading tables, see About grading table types [>>]. |
7 | Add summaries of attendance and credits: |
= | To add a column showing credit awarded for a grade item (report card only), under Report Card Columns, select a grade item. From the Actions menu, click Add Column > Credit Awarded. |
= | To add a column indicating the cumulative absences in a course (report card only), under Report Card Columns, select a Course Grade for one of the grading periods. From the Actions menu, click Add Column > Cumulative Absences. |
= | To add a column indicating the total absences in a course (progress report only), under Progress Report Columns, select a Course Grade for one of the grading periods. From the Actions menu, click Add Column > Total Absences. |
= | To add a row of total absences (excused and unexcused) for each grade item for each grading period, click Add Row > Total Absences from the Actions menu. |
= | To add a row of unexcused absences for each grade item for each grading period, click Add Row > Unexcused Absences from the Actions menu. |
= | To add a row of excused absences for each grade item for each grading period, click Add Row > Excused Absences from the Actions menu. Note: If you add a Credit Awarded or Cumulative Absences column, the Grade Item Display column shows N/A. |
Note: Cumulative Absences typically indicate absences during the selected grading period. However, if you add only one Cumulative Absences column and it is in the last grading period, the column indicates absences during the entire year.
Attendance numbers for a course only appear on the report card if the course appears on the report card.
Therefore, if a student transfers between courses, the report card displays both courses - and absences in them - only if the student receives a grade for both courses. Similarly, if a student withdraws, the report card displays the course - and absences in it - only if the student receives a grade for the course.
8 | If you want to display a grade item as a row on the report card or progress report instead of a column, select the grade item under Report Card Columns. From the Actions menu, click Switch Row/Column. When positioning elements as rows or columns, the following restrictions apply: |
= | Grade items that use Numeric, Letter Grade, or Graphic Symbol grading tables can be either columns or rows. They appear as columns by default. |
= | Grade items that use comment grading tables must appear in rows. |
= | Credit Awarded and Cumulative Attendance can appear only as columns. |
= | Total Absences, Unexcused Absences, and Excused Absences can appear only as rows. |
9 | Click OK. |
Figure 226: Report Card columns
www.powerschool.com
Tel: 866-434-6276
Email: smssupport@powerschool.com
Copyright 2015-2016 PowerSchool Group LLC and/or its affiliate(s). All rights reserved. All trademarks are either owned or licensed by PowerSchool Group LLC and/or its affiliates.