Open topic with navigation
| Scheduling > Common scheduling tasks > Changing a student's class assignments
Changing a student's class assignments
[Applies to elementary [>>] and secondary [>>] school scheduling.]
Once student schedules are created in PowerSchool SMS, you can change a student's class assignments and assign the student to other classes, such as for specialty subjects that PowerSchool SMS might not have automatically assigned.
Typically, you make these changes in the Planning Calendar [>>] that is, before the school term starts. However, once school has started, you can make the changes in the Active Calendar [see also Adjusting class assignments during the year >>]
|
1
|
Open the student(s) schedule: |
|
a
|
Click Student Search and use the Basic search [>>] to find the student(s). |
|
b
|
Under Search Results, select the student(s). |
|
c
|
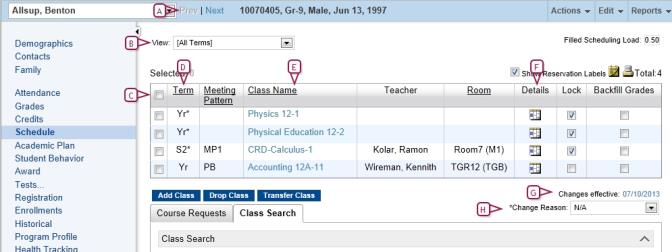
From the Actions menu, select Open Student > Schedule. The Student Schedule page appears [Figure 394]. Or on a student's Student Demographics page [>>], in the control bar, click Schedule. |
|
2
|
If working in the Active Calendar, set Changes Effective to indicate the time at which this change is to take effect. Options are: |
|
=
|
Today: The default selection. |
|
=
|
Specify: A specific calendar date. |
|
a
|
In the schedule, select the class/homeroom from which you want to transfer the student. |
|
b
|
Under Class Search, find the class/homeroom to which you want to transfer the student and select it. |
|
c
|
Click Transfer Class. Note: When working in the Active Calendar, Change Reason appears if the District Administrator has set up reasons. Selecting a reason may or may not be required. |
|
4
|
Drop a class, if necessary: |
|
a
|
In the schedule, select the class to drop. |
|
b
|
Click Drop Class. Note: Existing grades may be cleared, if you have permission to clear grades when a student's drop. |
|
5
|
Add a class, if necessary: |
|
a
|
Under Class Search, find the class to add. |
Figure 394: Student Schedule page

|
A
|
Prev | Next: When you open more than one student's schedule, this enables you to switch to another student's schedule. |
|
B
|
View: Determines what courses appear based on the Term column. |
|
C
|
Columns: You can adjust the columns displayed [>>]. |
|
D
|
Term: The term in which the class occurs, for example, "S1" for semester 1 or "FYT" for Full-Year Term. An asterisk (*) indicates that the student left the class before the end of the term. [see Student Manage section for duplicate information] |
|
E
|
Class Name: Click the name to view a class roster. |
Note: A subject exception may display for this class [see Subject exceptions >>]
|
F
|
Details: Click to view detailed information about the class. |
|
G
|
Changes Effective: Relevant when working in the Active Calendar [>>]. |
|
H
|
Change Reason: Working in the Active Calendar, thisappears if the District Administrator has set up reasons. Selecting a reason may or may not be required (indicated by an *). |
|
I
|
Re-assign/Assign Default Classes: Where a student enrolls in a school after schedules are created, click this to assign default classes to that student. Where you want to return the student's schedule to the default, click this. The button name changes according to the state of the schedule and the Subject Scheduling Permission [>>]. Note: Where a student has transferred homerooms during the school year, when this is clicked, PowerSchool SMS generates a schedule based on the student's homeroom or grade the first day of school to the transfer date, then another schedule for the new homeroom or grade from the transfer day to the last day of school. PowerSchool SMS does not consider the Effective Date. PowerSchool SMS does not change any class that was added by the administrator. |
Note: In the Active Calendar [>>], if you transfer a student to another class with Changes Effective set to First Day of School, the class change is deleted and PowerSchool SMS reassigns the student to the auto-generated class (except if both classes belong to the same subject; in which case the administrator must explicitly reassign the student). You can ensure that PowerSchool SMS does not delete such a class change by setting Changes Effective to the date of the second day of school. This might, however, affect grading and attendance calculations for the school. In the Planning Calendar, if you set Changes Effective to First Day of School, PowerSchool SMS recreates manually dropped classes in the student's schedules.
Adjusting class assignments during the year
During the school year (that is, in the Active Calendar [>>]), staff at a school can assign one or more students to a class, transfer students from one class to another, or just drop students from a class. Examples of a need to adjust class assignments include:
|
=
|
A walk-in student needs to be assigned to a class. |
|
=
|
A group of students taking Music for the first half of the year switch to Art for the second half. |
|
=
|
A student no longer needs a resources service part way through the year. |
Staff can use the student's schedule [>>] or a class roster to affect a class assignment change.
|
1
|
On the Class Roster page [>>], in the Actions menu, select Add Students.... The Select Students dialog appears. |
|
2
|
Use Last name and First name to search for one or more students. |
|
3
|
Click Search. PowerSchool SMS displays students under Search results. |
|
4
|
Select the student(s) and click Add. The Class Change Options dialog appears. |
|
5
|
Set options, which include: |
|
=
|
"Today": The default selection |
|
=
|
"Student's first day in school this year" |
|
=
|
"Specify": A specific calendar date |
|
=
|
Change Reason: Appears if the district provides pre-set reasons. A selection may be required. |
|
1
|
On a Class Roster page [>>], select one or more students. |
|
2
|
In the Actions menu, select Transfer Students.... The Transfer to Class page appears. |
|
3
|
For Class, select another class. |
|
4
|
Click OK. The Class Change Options dialog appears. |
|
5
|
Set class change options, which include: |
|
=
|
Today: The default selection. |
|
=
|
Student's first day in school this year
|
|
=
|
Specify: A specific calendar date. |
|
=
|
Change Reason: Appears if the district provides pre-set reasons. A selection may be required. |
|
1
|
On a Class Roster page [>>], select one or more students. |
|
2
|
In the Actions menu, select Drop Students.... The Transfer to Class page appears. |
|
3
|
For Class, select "None". |
|
1
|
On a Class Roster page [>>] or a homeroom's Roster page, select one or more students. |
|
2
|
In the Actions menu, select Assign > Classes. The Assign Classes page appears. |
|
3
|
Under Class Search, locate classes. |
|
4
|
Under Class Search Results, select the classes to which to assign the students. |
|
5
|
Select the Change Reason. |
|
=
|
Working in the Active Calendar, Change Reason appears if the District Administrator has set up reasons. Selecting a reason may or may not be required. |
|
6
|
Set the Changes Effective. |
|
=
|
Relevant when working in the Active Calendar. |
|
7
|
Click Add Class. PowerSchool SMS displays the classes under AddClasses. |
|
=
|
To drop the selected students from the selected classes, click Drop Class. PowerSchool SMS displays the classes under Drop Classes. |
|
=
|
To transfer the selected students between one class under Add Classes and one under Drop Classes, select Transfer. |
Transferring an elementary student from one homeroom to another
During the year (that is, in the Active Calendar [>>]), staff at a school can transfer a student from one homeroom to another. (In elementary scheduling [>>], every student must be assigned to a homeroom [>>].) While a staff member can change a student's homeroom on that student's record [see >>], transferring the student from a homeroom roster provides detailed information, including gender and ethnic category.
Note: You can transfer a student to a homeroom in another school. The grade levels offered or not offered at that school have no effect on the transfer.
|
1
|
On a homeroom's Roster page [>>], select one or more students. |
|
2
|
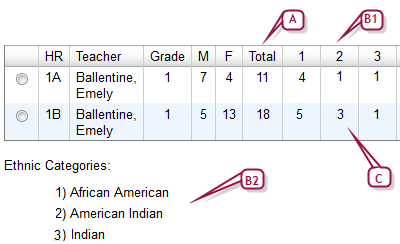
In the Actions menu, select Transfer Homeroom.... The Transfer Homeroom page appears [Figure 395]. |
|
4
|
Click OK. The Class Change Options dialog appears. |
|
5
|
Set class change options, which include: |
|
=
|
Today: The default selection. |
|
=
|
Student's first day in school this year
|
|
=
|
Specify: A specific calendar date. |
|
=
|
Change Reason: Appears if the District Administrator has set up reasons. A selection may be required. |
|
6
|
Click OK. PowerSchool SMS changes the student's homeroom and changes all classes taught in that homeroom class to the classes taught in the new homeroom (except for classes you scheduled manually). |
Figure 395: Transfer Homeroom page

|
A
|
Total: Indicates the total number of students assigned to the homeroom. An exclamation mark (!) indicates that the homeroom is at capacity. |
|
B
|
B1: Indicates the ethnic category and B2: is the legend for the ethnic categories. |
|
C
|
Subtotals that indicate the number of students in each ethnic category. |
|
1
|
On a Student Search results page [>>], select one or more students. |
|
2
|
In the Actions menu, select Assign > Values. The Assign Values dialog appears. |
|
3
|
For Assign Field, select "Homeroom". |
|
4
|
For Value, select the homeroom. |
Viewing student schedule changes
A student's schedule displays the student's schedule as of the end of the school year. You can view each change made to a student's schedule during the year and its effective date. To be displayed, the change must take place over time; for example, a class added and dropped on the same day is not recorded as a change.
Note: A student's Schedule Change History is only available in the Active Calendar [>>]. Note: For any change to the student's Grade or Homeroom Change History, PowerSchool SMS records under Last Updated By the name of the user who recorded the change (if PowerSchool SMS made the change, the field is left blank).
|
1
|
In the Active Calendar, open the student(s) schedule: |
|
a
|
Click Student Search and use the Basic search [>>] to find the student(s). |
|
b
|
Under Search Results, select the student(s). |
|
c
|
From the Actions menu, select Open Student > Schedule. The Student Schedule page appears [Figure 394]. |
|
=
|
Or on a student's Student Demographics page [>>], in the control bar, click Schedule. |
|
2
|
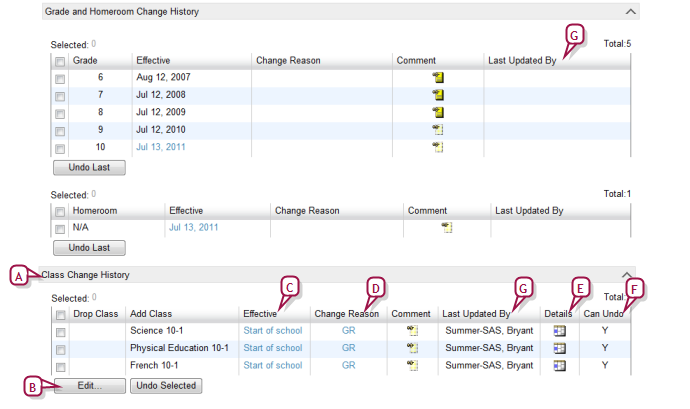
From the Actions menu, select View Change History. The Schedule Change History page appears [Figure 396]. |
Figure 396: Schedule Change History page

|
A
|
Class Change History: On this page, PowerSchool SMS displays change histories appear in three sections: Grade and Homeroom Change History, Class Change History, and Subject Exception History. |
|
B
|
Edit...: Click to edit the selected change. The Edit Class Change popup page appears. |
|
C
|
Effective: Indicates the class's current Effective Date. Click to view or adjust the change. |
|
D
|
Change Reason: The reason for a change. Click the reason to view and adjust the class change. |
|
E
|
Details: Click the icon to view and adjust the class's details. |
|
F
|
Can Undo: "Y" indicates that you can reverse this change.To reverse it, select the change and click Undo Selection. Only the most recent set of changes are reversible. |
|
G
|
Last Updated By: Shows which user made the change. |

www.powerschool.com
Tel: 866-434-6276
Email: smssupport@powerschool.com
Copyright 2015-2016 PowerSchool Group LLC and/or its affiliate(s). All rights reserved. All trademarks are either owned or licensed by PowerSchool Group LLC and/or its affiliates.
 You can do this if your role is School Administrator.[SA]
 You can do this if your role is School Administrator.[SA]


