Open topic with navigation
Build the school's master schedule
[Applies to secondary [>>] school scheduling]
As a School Administrator at a secondary school, you build a master schedule for the school for the coming year in the Planning Calendar. The master schedule is made up of all classes created for the school, with all of their associated terms, meeting patterns, teachers, and rooms. With a master schedule in place, you can schedule teachers, analyze student course requests, and assign teachers and rooms to classes.
To build a master schedule, a planning schedule [>>] with a scheduling structure and course offerings must be in place. Since each planning schedule has its own master schedule, you can experiment with several scheduling scenarios. Such experimentation might involve several iterations of the master schedule, in each of which you can analyze and adjust student requests, class scheduling parameters, and teacher allocations. When you are satisfied with master schedule, you can load students into it.
You can have PowerSchool SMS build a master schedule for one or more classes automatically. In preparation, you set various scheduling options [>>].
|
1
|
In the Admin menu, click Scheduling. The Scheduling page appears. |
|
3
|
Locate the course, teacher, or room for which to schedule classes: |
|
=
|
Click By Course, By Teacher, or By Room. PowerSchool SMS displays a list under Search Results. |
|
4
|
Locate the class(es) to schedule by searching under Class Search. |
|
5
|
Under Class Search Results, select the class(es) to schedule. |
|
=
|
When a class is selected, PowerSchool SMS displays information on that class under Class Information, including capacity, scheduling group, teaching team, scheduling constraints [>>], terms, meeting pattern, teachers, and room. |
|
6
|
In the Actions menu, click Schedule Classes.... |
|
=
|
Or, under Search Results, click Add for the specific course, teacher, or room. |
|
=
|
To remove a class from the schedule, under Search Results, select it and click Remove from Schedule. |
|
7
|
Click OK. PowerSchool SMS assigns a meeting pattern, teacher, and room to the selected class(es) based on class scheduling options [>>]. |
You can build part or all of the Master Schedule manually, that is, add and remove classes deliberately one at a time without employing PowerSchool SMS's automatic processes. Also, when the schedule is active, you can modify class schedules as necessary during the school year.
|
1
|
In the Admin menu, click Scheduling. The Scheduling page appears. |
|
3
|
Click By Course, By Teacher, or By Room and use the Course Search, Teacher Search, or Room Search to locate the course, teacher, or room for which to schedule the class. |
|
4
|
Under Search Results, click Add for the specific course, teacher, or room. |
|
=
|
To remove a class from the schedule, under Search Results, select it and click Remove from Schedule. |
|
5
|
Click OK. PowerSchool SMS schedules the class. |
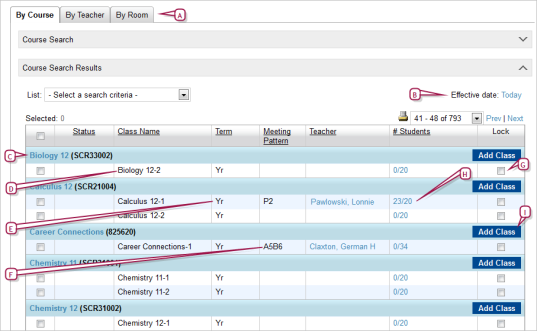
Figure 411: Master Schedule page: By Course

|
B
|
Effective date: The date of the information currently displayed. To change the date, click the link. |
|
C
|
Course name: Click to view the course's scheduling. |
|
D
|
Class Name: The class name and section. Click the name to view class information. |
|
E
|
Term: The term the class is offered. The list of terms displayed for a class is controlled by the Course Offerings & Meeting Patterns settings for the course. In this example, the term is one year |
|
F
|
Meeting Pattern: The meeting pattern for the class. The list of meeting patterns displayed for a class is controlled by the Course Offerings & Meeting Patterns settings for the course. Part of this definition includes different meeting patterns for different scheduling groups, so if you change the scheduling group for the class, the list of meeting patterns changes as well. |
|
G
|
Lock: Indicates that automated processes, such as Master Schedule Builder and Student Loader, cannot change the information in the row. The administrator can make changes manually. To lock all classes in the schedule, in the Actions menu click Lock All Classes; to reverse this click Unlock All Classes. |
|
H
|
# Students: The number of students assigned to the class. Click to view the class roster. The format is as follows: <current #> (<high water #>)/<class capacity>, where: |
<current #> is the number of students in the class as of the current date or the date set in the Changes Effective field (Active Calendar [>>]) or the number of students on the first day of classes (Planning Calendar [>>]).
<high water #> is the highest number of students that the class has from this point in the school year forward.
<class capacity> is the capacity of the class from the class schedule data.
For example: 27 (31)/30 indicates that there are currently (or on the effective date) 27 students in the class and at one time during the year (after the effective date), the class will be (or was) at 31 students.
|
I
|
Add Class: Adds a class to the course. |
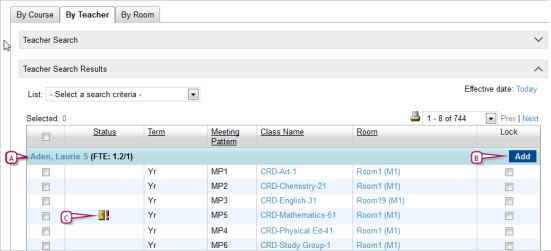
Figure 412: Master Schedule page: By Teacher

|
A
|
Teacher: Click the teacher's name to view the teacher scheduling page. The name is followed by the teacher's FTEs. The first number in the FTE is the sum of the teacher's scheduled classes divided by the district full-time teaching load. If the teacher's teaching load is the same as the district default, the second number in the FTE is 1.0. If the teacher's default has been overridden, the second number is the overridden teaching load divided by the district full-time teaching load. |
|
B
|
Add: Adds the class(es) selected under Class Search Results to the teacher. |
|
C
|
Status: Indicates any conflicts. This column is blank until you run Master Schedule Builder or until you save any manual changes to the schedule. It is also blank if the class has no conflicts. Possible states include: |
The class is full, that is, it has reached its capacity. If you use overfill then this is capacity + overfill percentage.
The class is overfull, that is, it has exceeded its capacity. If you use overfill then this is capacity + overfill percentage.
A teacher conflict, that is, this class is scheduled but the teacher is scheduled for another class in the same period.
A room conflict, that is, this class is scheduled but the room is assigned to another class at the same time.
This class is part of a combined set of classes.
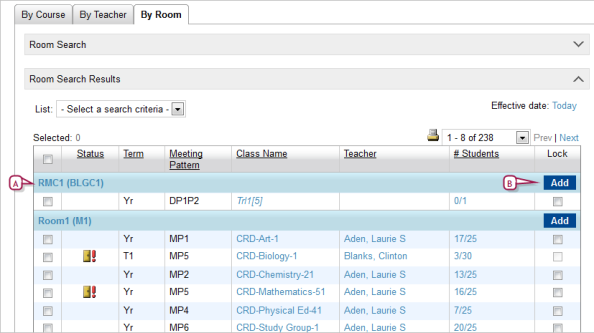
Figure 413: Master Schedule page: By Room

|
A
|
Room and building: Click the room name to view room information. |
|
B
|
Add: Adds the class(es) selected under Class Search Results to the room. |
Teacher Class Role
The Teacher Class Role specifies the teacher's role in the classroom, such as "Teacher of Record" (this role is typically assigned to the lead teacher), Student Teacher", "Teacher's Aide", or "Class Observer". Only one teacher, the lead teacher, can be a Teacher of Record for any given date across the class schedule. Note: If your district uses PowerTeacher gradebook and there are multiple Teacher Class Roles, some roles (other than Teacher of Record) may prevent teachers from gaining access to PowerTeacher.
|
1
|
In the Admin menu, click Scheduling. The Scheduling page appears. |
|
3
|
Click By Course and locate the course that contains the class. |
|
4
|
Under Course Search Results, select the class and expand the Class Information panel. |
|
5
|
Under Class Schedule, at the bottom of the page, click in the row for each column and enter the information. [Figure 417]. |
Class scheduling options
Class scheduling options determine how the PowerSchool SMSMaster Schedule Builder creates and schedules classes and how it loads teachers into schedules.
During the teacher allocation process, Master Schedule Builder takes into account teacher course preferences and other constraints. For teachers who have equal preferences, Master Schedule Builder allocates teachers in a "card-dealing" method, starting with the teacher with the fewest classes. If teachers have the same number of classes, teachers are allocated randomly and not alphabetically.
|
1
|
In the Planning Calendar, in the Admin menu, click Scheduling. The Scheduling page appears. |
|
2
|
For Planning Schedule, select a planning schedule [>>]. |
|
3
|
Click Class Scheduling Options. The Class Scheduling Options page appears. |
|
4
|
On the Class Scheduling Options page, set the following options: |
|
=
|
Name Based On: Indicates the basis for the class name: Course Name, Short Name, Alternate Name, or Course Number. |
|
=
|
Number Increment: The number to be incremented for each new class that is created; a number between 1 to 100. |
|
=
|
Style: The format used to display class names: |
|
=
|
Teacher Over-Allocation Percentage: 0 (the default) means that the Master Schedule Builder never over allocates teachers. This percentage gives the scheduling algorithm the flexibility to shift the load beyond the teacher allocation. A teacher's individual teaching load will never exceed its maximum. Depending on how high this percentage is set, a teacher might get more classes in one course and fewer classes in another course. For example, at 20%, a teacher with five classes might get one additional class (20% x 5 = 1). At 10%, a teacher with ten classes might get another class. At 34%, a teacher with six classes might get two additional classes. |
|
=
|
Weighted Options for the Schedule Classes process: Specifies factors that take priority when building schedules. By default, the Master Schedule Builder uses the following order of priority: |
|
=
|
Minimize potential student conflicts: Classes are scheduled according to the conflict matrix to avoid schedule conflicts. If this option is moved to a higher priority than other options, student schedules have fewer conflicts, at the expense of teacher and room allocations. |
|
=
|
Use teacher course allocations: Teachers are scheduled according to the settings in the Teacher Allocations page. If this option is not selected then teachers are allocated based only on their course preferences |
|
=
|
Use course room preferences: Classes are scheduled according to the room preferences set for courses. |
|
=
|
Use teacher room preferences: Classes are scheduled according to the room preferences set for teachers. |

www.powerschool.com
Tel: 866-434-6276
Email: smssupport@powerschool.com
Copyright 2015-2016 PowerSchool Group LLC and/or its affiliate(s). All rights reserved. All trademarks are either owned or licensed by PowerSchool Group LLC and/or its affiliates.
 You can do this if your role is School Administrator.[SA]
 You can do this if your role is School Administrator.[SA]


