Open topic with navigation
Setting up immunization rules
Immunizations include any type of medication provided to students to ward against infection by common viruses and other diseases.
Immunizations can be “required” or “recommended”. If an immunization is required, rules must be defined. Immunization rules specify when students are required to fulfill immunization requirements.
A PowerSchool SMS nightly task calculates student immunization compliance. When a change occurs, such as a student’s age changes, the next dose due date for an immunization has passed, or a rule is changed, the nightly task recalculates compliance. Students who do not comply with the immunization rules are assigned a provisional enrollment status and an alert is sent to the appropriate user at the student’s home school.
Before you set up immunization rules, make sure the immunization Setup Lists contain the list items required. For more information about Setup Lists and Setup List Pairs, see Ensure consistent data [>>]. For information about Setup Lists for Health Tracking, see Setting up provisional enrollment [>>].
Adding and editing immunizations
When you add an immunization, you enter a name and description of the immunization and indicate whether it is required. If the immunization is required, enter the requirements.
|
1
|
In the Admin menu, click District Setup. The District Setup page appears. |
|
2
|
Under Preferences, click Health. The Health Preferences page appears. |
|
3
|
In the control bar, click Immunization Setup. The Immunization Setup page appears. |
|
4
|
To add an immunization, click Add. The Add/Edit Immunization page appears. |
|
=
|
To edit an immunization, click the immunization name. |
|
=
|
To delete an immunization, select the immunization you want to delete. From the Actions menu, click Delete. Skip the remaining steps. |
|
5
|
Enter the immunization information, which includes: |
|
=
|
Code: The local code for the immunization. |
|
=
|
Description: The local description of the immunization. |
|
=
|
State Code: The state code for the immunization. |
|
=
|
State Description: The state description of the immunization. |
|
6
|
Click Save & Add to save the data and open a new Add/Edit Immunization page or OK to close the page. |
Setting up immunization requirements
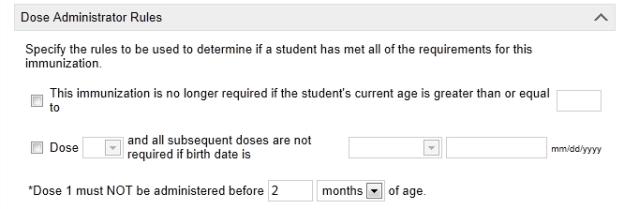
When you select the Required checkbox on the Add/Edit Immunization page, the Dose Administrator Rules panel opens [Figure 349], which enables you to specify the rules to be used to determine if a student has met all the requirements for the immunization.
Note: If, at a later time, you want to make an immunization recommended rather than required, you can do so by deselecting the Required checkbox on the Add/Edit Immunization page. The dose administration rules you created will be hidden, but not deleted, on the student Immunizations page Required tab and visible on the student Immunizations page Recommended tab. Later, if you want to make this immunization required again, simply select the Required checkbox and your dose rules will reappear on the student Immunizations page Required tab and disappear from the student Immunizations page Recommended tab.
|
1
|
In the Admin menu, click District Setup. The District Setup page appears. |
|
2
|
Under Preferences, click Health. The Health Preferences page appears. |
|
3
|
In the control bar, click Immunization Setup. The Immunization Setup page appears. |
|
4
|
Click the link for the immunization. The Add/Edit Immunization page appears. |
|
5
|
Select the Required checkbox. |
|
=
|
This immunization is no longer required if the student's current age is greater than or equal to ____: Select if the immunization is not required after a specific age and enter the appropriate age. |
|
=
|
Dose and all subsequent doses are not required if birth date is ____: Select if a specific immunization dose and any subsequent doses are not required if a student was born before or after a specified date (i.e., grandfathered against an immunization dose) select and enter the applicable birth date. |
|
=
|
Dose 1 must NOT be administered before ___ ___ of age: Enter the minimum age at which the dose can be given. |
|
7
|
Click Save & Add to save the data and open a new Add/Edit Immunization page or click OK to close the page. |
Figure 349: Dose Administrator Rules

Creating dose administration rules
When an immunization is required, create a dose administration rule. Dose administration rules are based on students’ ages and help you determine when immunization doses are required. When you create a dose rule, you specify the age range to which the rule applies. To determine when (or if) a dose is necessary, the dose administration calculation looks at the student's current age and looks at the rules for the student’s current age range, then calculates the due date for the dose.
|
1
|
In the Admin menu, click District Setup. The District Setup page appears. |
|
2
|
Under Preferences , click Health. The Health Preferences page appears |
|
3
|
In the control bar, click Immunization Setup. The Immunization Setup page appears. |
|
4
|
Click the link for the immunization. The Add/Edit Immunization page appears. |
|
5
|
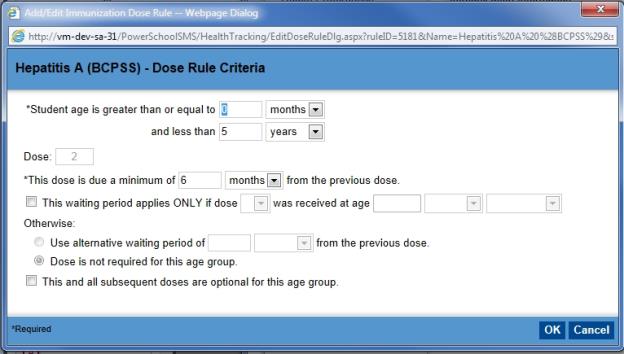
Click Add. The Add/Edit Immunization Dose Rule dialog appears. |
|
6
|
Complete the fields, which include: |
|
=
|
Student age is greater than or equal to ___ ___ and less than ___ ___ of age.: The student age parameters for this dose. This immunization dose will only be applicable to students in the age group you enter here. If you modify the student age for the dose, the dose number will be reset (if applicable), for the new age. Note: When entering multiple dose rules, ensure the age groups you enter do not overlap. |
|
=
|
Dose: This field displays the dose number. Note: If this is the first dose you have created for this immunization, the number 2 displays in this field because dose 1 was created when you set up your dose administration rules on the Add/Edit Immunization page. |
|
=
|
This dose is due a minimum of ___ ___ from the previous dose: The interval required between this dose and the previous dose. This is the “waiting period”. |
|
=
|
This waiting period applies ONLY if dose ___ was received at ___ ___: If the waiting period for this dose applies only if a previous dose was received as of a certain age, select this checkbox box and enter the dose number and age information. |
|
=
|
Use alternative waiting period of ___ ___ from the previous dose: If the waiting period does not apply to this dose, select this checkbox and enter the alternative waiting period information. |
|
=
|
Dose is not yet required for this age group: If a dose is not required for this age group, select this checkbox. |
|
=
|
This and all subsequent doses are optional for this age group: If this dose and all the following doses are optional for this age group, select this checkbox. |
|
7
|
Click Save & Add to save the data and add a new Immunization Dose Rule or click OK to save the data and close the dialog. The Add/Edit Immunization page appears. |
Figure 350: Add/Edit Immunization Dose Rule

Copying immunization rules
If you need to set up multiple immunizations that have the same rules, copy the immunization rules from one immunization to another. You can also copy rules that have the same rule structure and then just make any necessary adjustments.
To copy immunization rules, first create a “target” immunization record i.e., the immunization record to which you want to copy the immunization rules. When this record is created, open the immunization you want to copy from and copy the information to the target immunization record.
Note: A copied rule replaces any rules that have been defined previously for the target immunization.
|
1
|
In the Admin menu, click District Setup. The District Setup page appears. |
|
2
|
Under Preferences , click Health. The Health Preferences page appears |
|
3
|
In the control bar, click Immunization Setup. The Immunization Setup page appears. |
|
4
|
Click Add. The Add/Edit Immunization page appears. |
|
5
|
Complete the fields and ensure the Required checkbox is selected. |
|
6
|
Navigate to the Add/Edit Immunization page for the immunization that contains the rules you want to copy and, from the Actions menu, click Copy Immunization Rules. The Copy Immunization Rules dialog opens. |
|
7
|
Select the immunization you created in step 4. |
Changing the display order of immunizations
You can change the order in which immunizations appear on the Quick Entry page and the student Immunizations page. (For information about these pages, see Health tracking at the school [>>].)
|
1
|
On the Immunization Setup page, from the Actions menu, click Change Order. The Change Order dialog opens. |
|
2
|
Select the immunization you want to move. |
|
3
|
Use the up or down arrow to reposition the immunization in the list. |

www.powerschool.com
Tel: 866-434-6276
Email: smssupport@powerschool.com
Copyright 2015-2016 PowerSchool Group LLC and/or its affiliate(s). All rights reserved. All trademarks are either owned or licensed by PowerSchool Group LLC and/or its affiliates.
 You can do this if your role is District Administrator.[DA]
 You can do this if your role is District Administrator.[DA]


