This section describes each step that must be completed to run Year-End Processing manually.
Important: This section addresses only the Year-End Processing steps. It assumes that you have completed the Next-Year Preparation steps and that you have created a historical database shell and, if you are using address validation, that all geocodes are assigned correctly.
Important: When you use the manual YEP method, you must back up your database manually.
If you have custom data in your database and you want to tell PowerSchool SMS how to handle that custom data during YEP, modify the following stored procedures with the appropriate code:
= | YEP_BEFORE_DATA_MOVE_DELETE_CUSTOM |
= | YEP_MOVE_CUSTOM_DATA |
= | YEP_DELETE_ACTIVE_DATA_CUSTOM |
These stored procedures are updated when the following scripts are run:
= | YEP_BEFORE_DATA_MOVE_DELETE |
= | YEP_MOVE_ACTIVE_DATA |
= | YEP_DELETE_ACTIVE_DATA |
The following steps are required to complete Year-End Processing manually:
Before you run YEP, it is critical that you complete the listed steps according to Year-End Processing [>>]
1 | Preparing for Year-End Processing [district] [>>] |
2 | Creating a Historical Database shell [>>] |
3 | Perform Year-End Processing pre-check |
In addition, if your district uses the Geocode method and address validation, make sure the geocodes are assigned correctly for all schools and students. For more information, see Checking Geocode setup [>>].
Before you run Year-End Processing, clear the existing events from the YEP logs.
1 | From the Start menu, navigate to All Programs > Microsoft SQL Server > SQL Server Management Studio. |
2 | Connect to the active database. |
3 | Enter the following script: |
EXEC YEP_RESET_EVENTS
4 | Execute the script. |
Tasks cannot run while Year-End Processing is running. Before completing this step, make sure that all tasks are complete.
To prevent tasks from starting while Year-End Processing is running, stop all PowerSchool SMS task managers.
1 | On all PowerSchool SMS servers, from the Start menu, navigate to Programs > Administrative Tools > Services. |
2 | For each PowerSchool SMS service, right-click the PowerSchool SMS Task Manager service and select Stop. |
Back up your PowerSchool SMS database before you continue with the following Year-End Processing steps.
Before you start Year-End Processing, you need to prevent users from accessing the database while Year-End Processing is running.
Note: When you run Year-End Processing manually, no tasks display on the YEP Log page.
1 | From the Start menu, navigate to All Programs > Microsoft SQL Server > SQL Server Management Studio. |
2 | Connect to the active database. |
3 | Enter the following script: |
UPDATE CSL_ADM_DATABASE_INFO set YEP_IN_PROGRESS = 1, HISTORICAL_DATABASE = 0
4 | Execute the script. |
Note: To prevent Year-End Processing from running on any database backups, you can run the following script on each backup database: UPDATE CSL_ADM_DATABASE_INFO set IS_BACKUP = 1
To increase the effectiveness of the database page index and ensure Year-End Processing completes as quickly as possible, update statistics.
1 | From the Start menu, navigate to All Programs > Microsoft SQL Server > SQL Server Management Studio. |
2 | Connect to the active database. |
3 | Enter the following script: |
EXEC sp_updatestats
dbcc updateusage (0)
4 | Execute the script. |
Back up your PowerSchool SMS database before you continue with the remaining Year-End Processing steps. The database backup will become the historical database.
Note: Ensure you perform a complete database backup, not a differential backup.
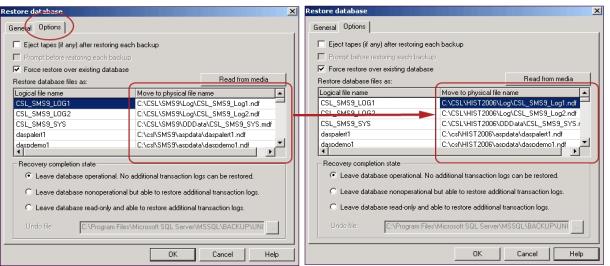
Restore the database backup over the historical database shell. Make sure the backup is restored to the correct location. For example, Enterprise Manager will restore the database files to the active database file path by default. If you are using Enterprise Manager to restore the backup, in the Restore Database dialog, you must manually change each database file path name to the historical database shell location.
To restore the database and change the file path name in Enterprise Manager:
1 | In Enterprise Manager, navigate to the active database. Right-click the database and select All Tasks > Restore Database. The Restore Database dialog opens. |
2 | Set the Restore option to From device. |
3 | Under Devices, click Select Devices. |
4 | Click Add and search for and select the database backup file you created in Step 7: Back Up Your Active Calendar Database [>>]. |
5 | Click Options. |
6 | For every logical file name, specify the path to the historical database shell. |
7 | Click OK. |
Figure 431: Restore database
A | By default, the Move to physical file name column specifies the path to the active database. You must change the path for every logical filename in the table to the path where the historical database shell is saved. |
1 | From the Start menu, navigate to All Programs > Microsoft SQL Server > SQL Server Management Studio. |
2 | Connect to the active database. |
3 | Enter the following script: |
EXEC sp_changedbowner ‘xxxx’
-- (where xxxx = db owner ID of the historical database shell)
4 | Execute the script. |
1 | From the Start menu, navigate to All Programs > Microsoft SQL Server > SQL Server Management Studio. |
2 | Connect to the active database. |
3 | Enter the following script: |
SELECT * from CSL_ADM_HISTORICAL_DB_INFO
4 | Execute the script. |
The script returns a list of historical databases created for this active database.
5 | Verify that the newly created historical database is included in the list and that the database name and location is correct. |
1 | From the Start menu, navigate to All Programs > Microsoft SQL Server > SQL Server Management Studio. |
2 | Connect to the Historical database. |
3 | Enter the following script: |
UPDATE CSL_ADM_DATABASE_INFO set HISTORICAL_DATABASE = 1, YEP_IN_PROGRESS = 0
4 | Execute the script. |
1 | From the Start menu, navigate to All Programs > Microsoft SQL Server > SQL Server Management Studio. |
2 | Connect to the active database. |
3 | Enter the following script: |
UPDATE CSL_ADM_DATABASE_INFO set IS_BACKUP = 0
4 | Execute the script. |
To improve performance, disable auditing.
1 | From the Start menu, navigate to All Programs > Microsoft SQL Server > SQL Server Management Studio. |
2 | Connect to the active database. |
3 | Enter the following script: |
EXEC DISABLE_AUDIT_TRIGGERS
4 | Execute the script. |
Note: Depending on the size of your database, this step may take a significant amount of time to complete. You can track the progress through the CSL_YEP_DEBUG_LOG_ELEM table. In addition, it is common for there to be data inconsistencies during this step and Year-End Processing may stop. If this occurs, correct the problem data, restore the database from the most current backup, and retry.
1 | From the Start menu, navigate to All Programs > Microsoft SQL Server > SQL Server Management Studio. |
2 | Connect to the active database. |
3 | Enter the following script: |
EXEC YEP_ELEM_CREATE_STD_HIST_RECS
4 | Execute the script. |
We recommend you back up your PowerSchool SMS database before you continue with the remaining Year-End Processing steps.
Note: Depending on the size of your database, this step may take a significant amount of time to complete. You can track the progress through the CSL_YEP_DEBUG_LOG table. In addition, it is common for there to be data inconsistencies during this step and Year-End Processing may stop. If this occurs, correct the problem data, restore the database from the most current backup, and retry.
1 | From the Start menu, navigate to All Programs > Microsoft SQL Server > SQL Server Management Studio. |
2 | Connect to the active database. |
3 | Enter the following script: |
EXEC YEP_CREATE_STD_HIST_RECORDS
4 | Execute the script. |
Before you continue with the remaining Year-End Processing steps, back up your PowerSchool SMS database.
Note: Depending on the size of your database, this step may take a significant amount of time to complete. You can track the progress through the CSL_PR_PROCESS_LOG table. In addition, it is common for there to be data inconsistencies during this step and Year-End Processing may stop. If this occurs, correct the problem data, restore the database from the most current backup, and retry.
1 | From the Start menu, navigate to All Programs > Microsoft SQL Server > SQL Server Management Studio. |
2 | Connect to the active database. |
3 | Enter the following script: |
EXEC PR_CREATE_ACTIVE_PERMANENT_RECORDS
4 | Execute the script. |
Before you continue with the remaining Year-End Processing steps, back up your PowerSchool SMS database.
To ensure student records and projections are up to date and based on the correct map, update student records. If errors occur, view CSL_NYP_ENROLLMENT_LOG.
1 | From the Start menu, navigate to All Programs > Microsoft SQL Server > SQL Server Management Studio. |
2 | Connect to the active database. |
3 | Enter the following script: |
EXEC UPDATE_NEXT_YEAR_STUDENTS 1
4 | Execute the script. |
Note: Depending on the size of your database, this step may take a significant amount of time to complete. In addition, it is common for there to be data inconsistencies during this step and Year-End Processing may stop. If this occurs, correct the problem data, restore the database from the most current backup, and retry.
1 | From the Start menu, navigate to All Programs > Microsoft SQL Server > SQL Server Management Studio. |
2 | Connect to the active database. |
3 | Enter the following script: |
EXEC YEP_POPULATE_ACTIVE_HIST_TBLS
4 | Execute the script. |
Before you continue with the remaining Year-End Processing steps, back up your PowerSchool SMS database.
Before moving data from the planning calendar to the new active calendar, run the following scripts to delete existing data that is no longer current from the active calendar.
Note: If data inconsistencies prevent data from being deleted, you must correct the problem data, restore the database from the most current backup, and retry.
1 | From the Start menu, navigate to All Programs > Microsoft SQL Server > SQL Server Management Studio. |
2 | Connect to the active database. |
Tennessee customers only, enter the following script:
EXEC YEP_RESET_DATA_TN
3 | Execute the script. |
4 | All customers, enter the following script: |
EXEC YEP_BEFORE_DATA_MOVE_DELETE
5 | Execute the script. |
Once outdated information is removed from the active database, you can move the planning calendar to the active calendar.
1 | From the Start menu, navigate to All Programs > Microsoft SQL Server > SQL Server Management Studio. |
2 | Connect to the active database. |
3 | Enter the following script: |
EXEC YEP_MOVE_ACTIVE_DATA
4 | Execute the script. |
Optionally, back up your PowerSchool SMS database to create a restore point. Skip this step if your district does not withdraw and re-enroll returning students during YEP. Note: If your District Preferences (District Setup > Preferences) are set to not create withdrawal and re-enrollment records for returning students, the script below will not process any data when you execute it.
1 | From the Start menu, navigate to All Programs > Microsoft SQL Server > SQL Server Management Studio. |
2 | Connect to the active database. |
3 | Enter the following script: |
EXEC YEP_CREATE_REENROLL_RETURN_STUDENT
4 | Execute the script. |
Optionally, back up your PowerSchool SMS database to create a restore point.
1 | From the Start menu, navigate to All Programs > Microsoft SQL Server > SQL Server Management Studio. |
2 | Connect to the active database. |
3 | Enter the following script: |
EXEC YEP_SYNC_STUDENT_ENROLLMENT
4 | Execute the script. |
Once the planning calendar data is moved to the new active calendar, delete the data from the previous active calendar data.
1 | From the Start menu, navigate to All Programs > Microsoft SQL Server > SQL Server Management Studio. |
2 | Connect to the active database. |
3 | Enter the following script: |
EXEC YEP_DELETE_ACTIVE_DATA
4 | Execute the script. |
Archive the old active calendar and update the planning calendar to be the active calendar.
1 | From the Start menu, navigate to All Programs > Microsoft SQL Server > SQL Server Management Studio. |
2 | Connect to the active database. |
3 | Enter the following script: |
EXEC YEP_ROLLOVER_CALENDAR
4 | Execute the script. |
The school calendars are ready for use. Create the secondary subject assignments on the new active calendar.
1 | From the Start menu, navigate to All Programs > Microsoft SQL Server > SQL Server Management Studio. |
2 | Connect to the active database. |
3 | Enter the following script: |
EXEC YEP_CREATE_SUBJECT_ASSIGNMENTS
4 | Execute the script. |
1 | From the Start menu, navigate to All Programs > Microsoft SQL Server > SQL Server Management Studio. |
2 | Connect to the active database. |
3 | Enter the following script: |
EXEC ENABLE_AUDIT_TRIGGERS
4 | Execute the script. |
Assign the day patterns from the planning calendar to the new active calendar.
1 | From the Start menu, navigate to All Programs > Microsoft SQL Server > SQL Server Management Studio. |
2 | Connect to the active database. |
3 | Enter the following script: |
EXEC YEP_APPLY_DAY_PATTERNS
4 | Execute the script. |
The steps for improving performance of this table are different depending on whether you are in a replicated environment.
To improve performance of the CSL_SMS_USER_CALENDAR table:
1 | From the Start menu, navigate to All Programs > Microsoft SQL Server > SQL Server Management Studio. |
2 | Connect to the active database. |
3 | Enter the following scripts: |
EXEC REPLICATION_DROP_ARTICLE CSL_SMS_USER_CALENDAR
--Comment this line out if you are not using replication
TRUNCATE TABLE CSL_SMS_USER_CALENDAR
--All environments use this line
EXEC REPLICATION_ADD_ARTICLE_TO_PUB_SUB CSL_SMS_USER_CALENDAR
--Comment this line out if you are not using replication.
DBCC CHECKIDENT (CSL_SMS_USER_CALENDAR, RESEED, 5000)
--All environments use this line
4 | Execute the scripts. |
After Year-End Processing completes, refresh statistics.
1 | From the Start menu, navigate to All Programs > Microsoft SQL Server > SQL Server Management Studio. |
2 | Connect to the active database. |
3 | Enter the following script: |
EXEC sp_updatestats
4 | Execute the script. |
Your database is now ready to use. Unlock the database.
1 | From the Start menu, navigate to All Programs > Microsoft SQL Server > SQL Server Management Studio. |
2 | Connect to the database. |
3 | To generate a list of active tasks, enter the following script: |
Update CSL_ADM_DATABASE_INFO set YEP_IN_PROGRESS = 0, IS_BACKUP = 0, HISTORICAL_DATABASE = 0, YEP_IS_MANUAL_BACKUP = 0
4 | Execute the script. |
After Year-End Processing is complete, you can restart the PowerSchool SMS task managers.
1 | On your PowerSchool SMS server, from the Start menu, navigate to Programs > Administrative Tools > Services. |
2 | For each PowerSchool SMS service, right-click the PowerSchool SMS Task Manager service and select Start. |
www.powerschool.com
Tel: 866-434-6276
Email: smssupport@powerschool.com
Copyright 2015-2016 PowerSchool Group LLC and/or its affiliate(s). All rights reserved. All trademarks are either owned or licensed by PowerSchool Group LLC and/or its affiliates.