[Applies to elementary and secondary schools]
Grading periods define the span of time that report cards and progress reports cover. For information about setting up grading periods, see:
Grading periods are defined in sets. Typically, you create multiple grading periods sets so that you can provide report cards at different times for different grades.
Note: Once you cover all the grades in your school, you cannot create more grading period sets unless you delete an existing one first.
When you define grading period sets, you can also specify a grace period for entering student grades. The grace period is the number of days past the last date of all grading periods that staff can continue to enter or submit grades. The grace period is not connected to past grades.
1 | In the Admin menu, click Grading. The Grading page appears. |
2 | Under Step 3, click Grading Periods. The Grading Periods page appears. |
3 | Under Grace Period, enter how many days staff can continue entering or submitting grades after the last date of each grading period. Note: The grace period you enter here applies to all grading periods in all grading period sets. |
4 | To add a set, select Add Grading Period Set from the Actions menu. The Edit Grading Period Set appears. |
= | To edit a set, click the name of the set. The Edit Grading Period Set appears. |
= | To delete a set, select the grading period set to delete and click Delete Grading Period Set from the Actions menu. Click OK and skip the remaining steps. |
5 | Define the entire set which includes: |
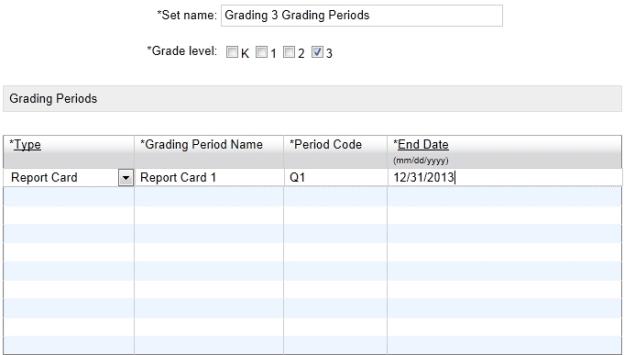
= | Set Name - Enter a meaningful name for the set of grading periods, such as "Grade 3 Grading Periods" |
= | Grade Levels - Select the grade levels that this set applies to. Note: If you do not select all of the grade levels, ensure you create additional sets for the remaining grade levels. The grade levels available are those that are not already covered by other grading period sets. |
6 | Add the grading periods. |
[Applies to secondary schools only.]
1 | On the Grading Periods page, from the Actions menu, click Add Grading Period. The Grading Periods for [calendar name] page appears |
= | To edit a period, click the name of the grading period. |
= | To delete a period, select the grading period and from the Actions menu, click Delete Grading Period. |
2 | Define grading periods as follows: |
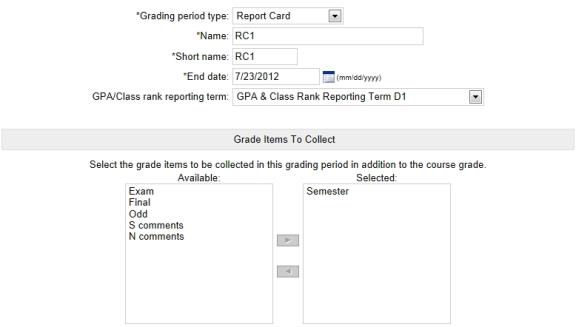
= | Grading Period Type: Indicate whether this grading period results in a progress report or a report card. |
= | Name: Enter the name of the reporting period as you want it to appear on reports; for example Report Card 1 or Interim Report 1. [Figure 204] |
= | Short Name: Enter up to six characters to identify each period that is displayed on the report card as a column heading; for example "Q1". |
= | End Date: Enter the end date of each reporting period. The first period starts on the first school day of the school year, while each subsequent period starts the day after the previous period end date. |
= | GPA/Class Rank Reporting Term: Appears only if your district has defined GPA/class rank reporting terms in the GPA/Class Rank Reporting Term setup list and the grading period type is Report Card [Figure 204]. |
= | Select the GPA/class rank reporting term to assign to the report card grading period. Only the grades for the grade items in this grading period will be included in the GPA calculations. For further information, see Grading periods and GPA/class rank reporting terms [>>]. Note: For instructions about how to update custom secondary report cards and/or transcripts to use the GPA/class rank reporting term functionality in PowerSchool SMS, see the Support website. |
= | Grade Items to Collect: Select grade items [>>] in the Available list and click to move them to the Selected list [Figure 204]. |
3 | Click OK. |
Figure 204: Grading period setup
[Applies to elementary schools only]
1 | On the Grading Periods page, from the Actions menu, click Add Grading Period. The Grading Periods for [calendar name] page appears |
= | To edit a period, click the name of the grading period. |
= | To delete a period, select the grading period and from the Actions menu, click Delete Grading Period. |
Note: If you need more rows, from the Actions menu, click Add Rows.
2 | Define grading periods as follows [Figure 205]: |
= | Type - Click in the first blank row and from the dropdown, select whether this grading period appears on a progress report or a report cards. |
= | Grading Period Name -Enter the name of the reporting period (such as Report Card 1 or Interim Report 1) as you want it to appear on reports. |
= | Period Code - Enter up to 3 characters to identify each period that is displayed on the report card as a column heading, for example "Q1". |
= | End Date - Enter the end date of each reporting period. The first period starts on the first school day of the school year, while each other period starts the day after the previous period end date. |
3 | Click OK. |
Figure 205: Define Grace Period
www.powerschool.com
Tel: 866-434-6276
Email: smssupport@powerschool.com
Copyright 2015-2016 PowerSchool Group LLC and/or its affiliate(s). All rights reserved. All trademarks are either owned or licensed by PowerSchool Group LLC and/or its affiliates.